[DEMO] Creating VPCs and Subnets

Christophe December 28, 2022
Access the interactive diagram for this lesson here. (It may ask you to create a free account in order to view. You do not need paid features to view this course’s content so you can ignore that!)
In the prior lesson, we talked about using default VPCs, and the downsides that they present. A recommended alternative is for you to create your own, nondefault VPCs, so that you have complete control over how they’re configured.
Setting up a VPC
Setting up a VPC is actually relatively simple and straightforward once you understand how it works. You define a virtual network, you select an IP range, you create your subnets, and configure route tables and network gateways.
Let’s do that by walking through it step-by-step.
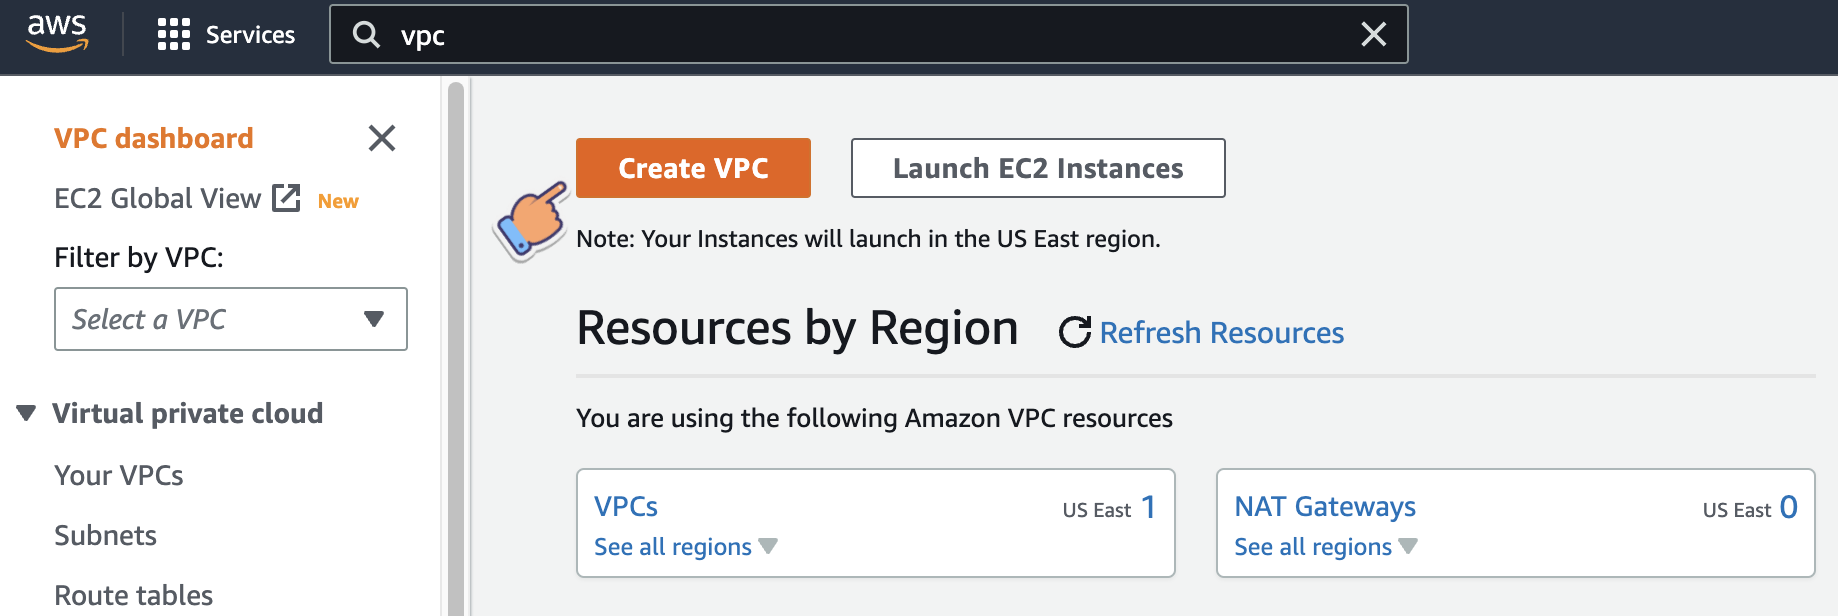
Log in to your AWS account if you haven’t already. Then, use the search bar to search for “VPC.”

From this page, we can click on “Create VPC”
From here, we can either create the “VPC only” or create the “VPC and more.”
What I like about the “VPC and more” is that it visually shows you what you will be creating and how it all ties together.
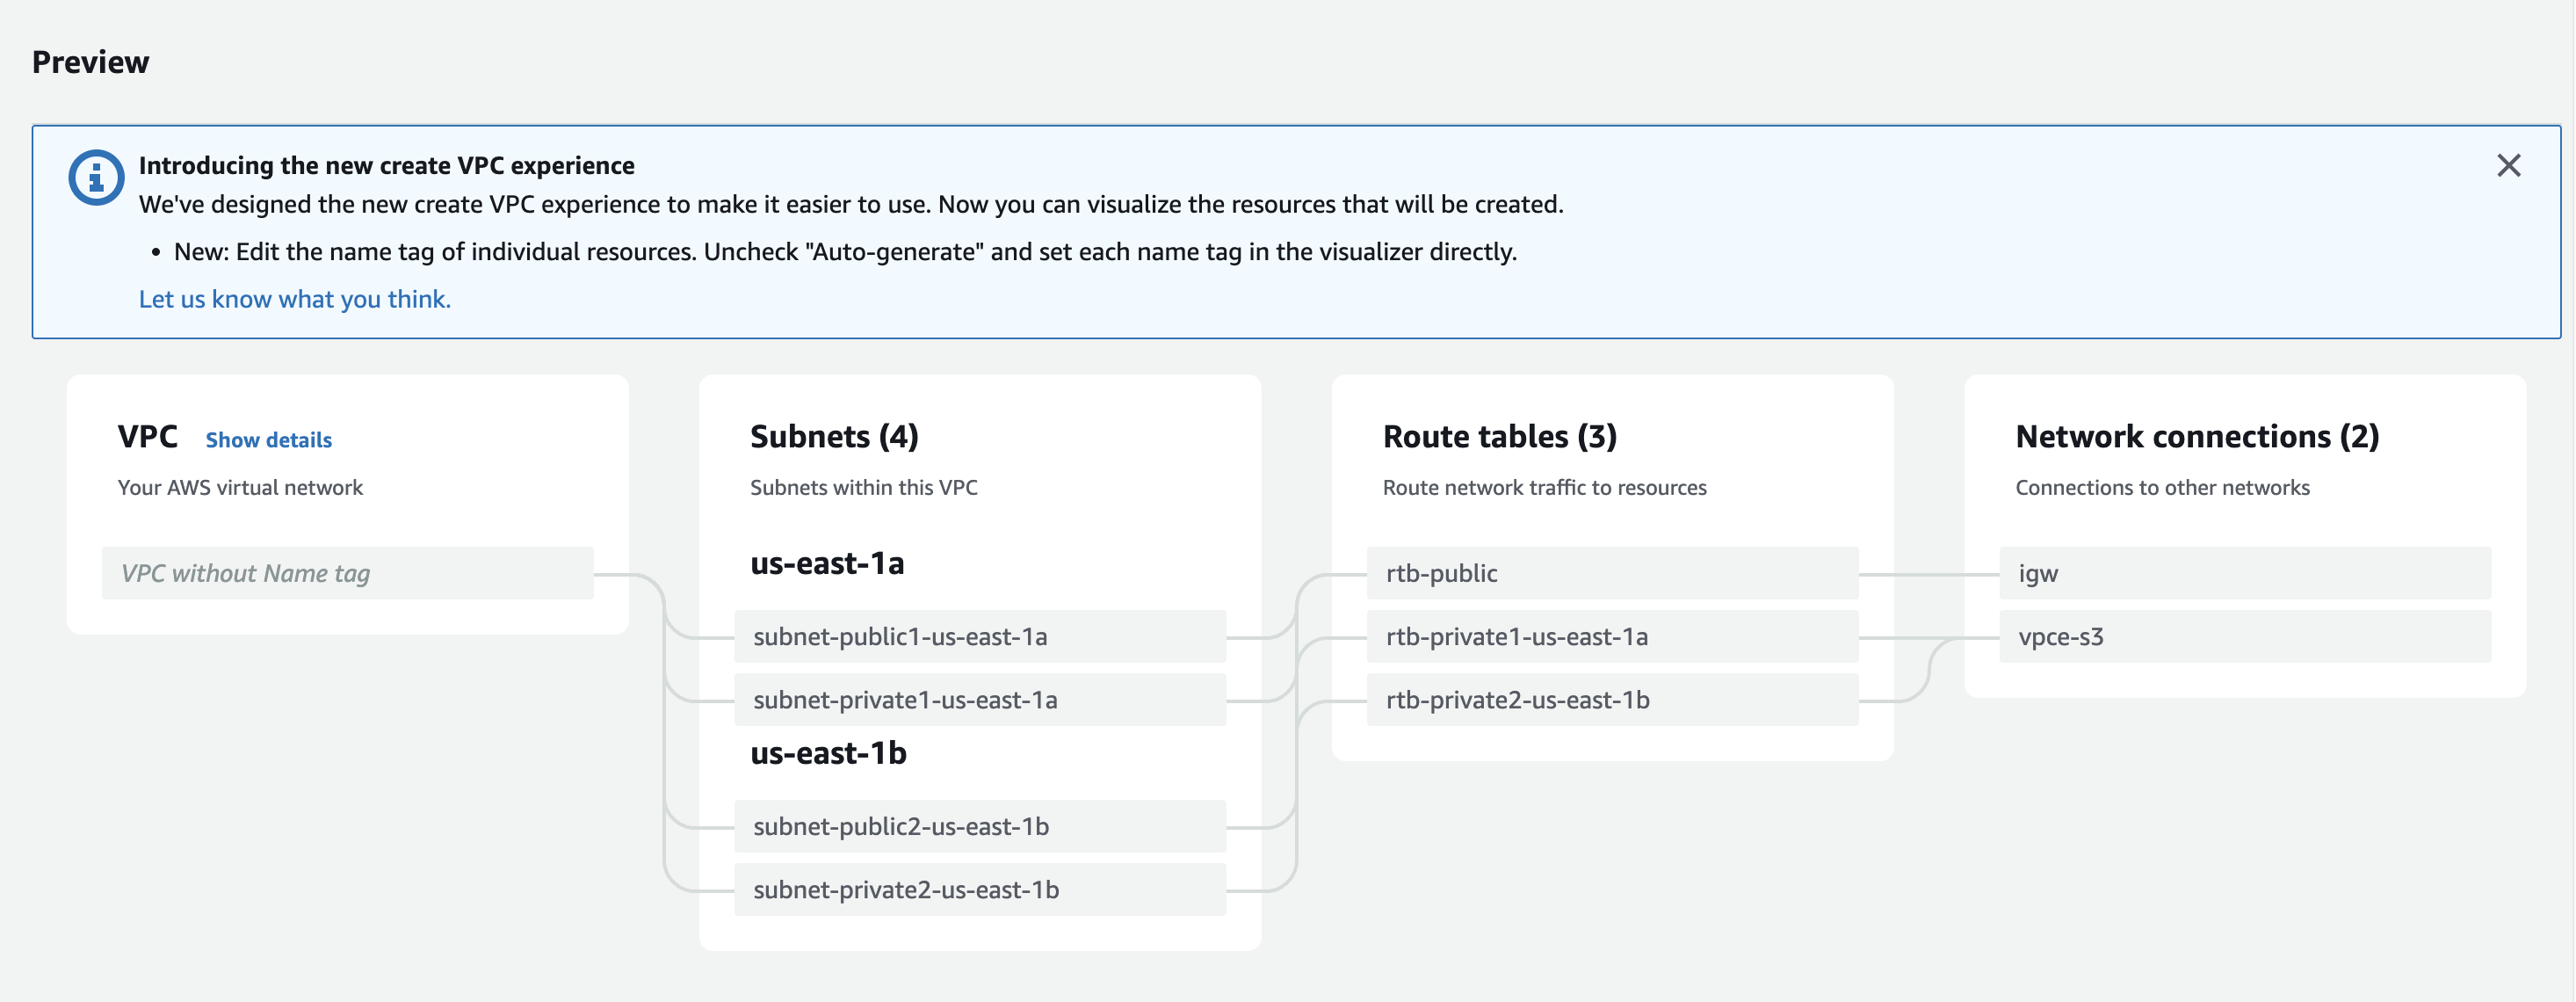
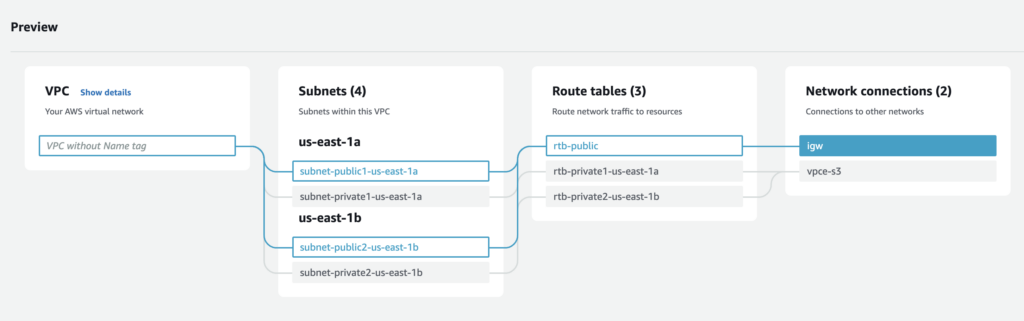
For example, from my screen, we can see that we are creating one VPC with 4 subnets across two different AZs. This is important because subnets cannot span across zones — your subnet can only reside in one AZ, and once it’s created, you can’t move it.
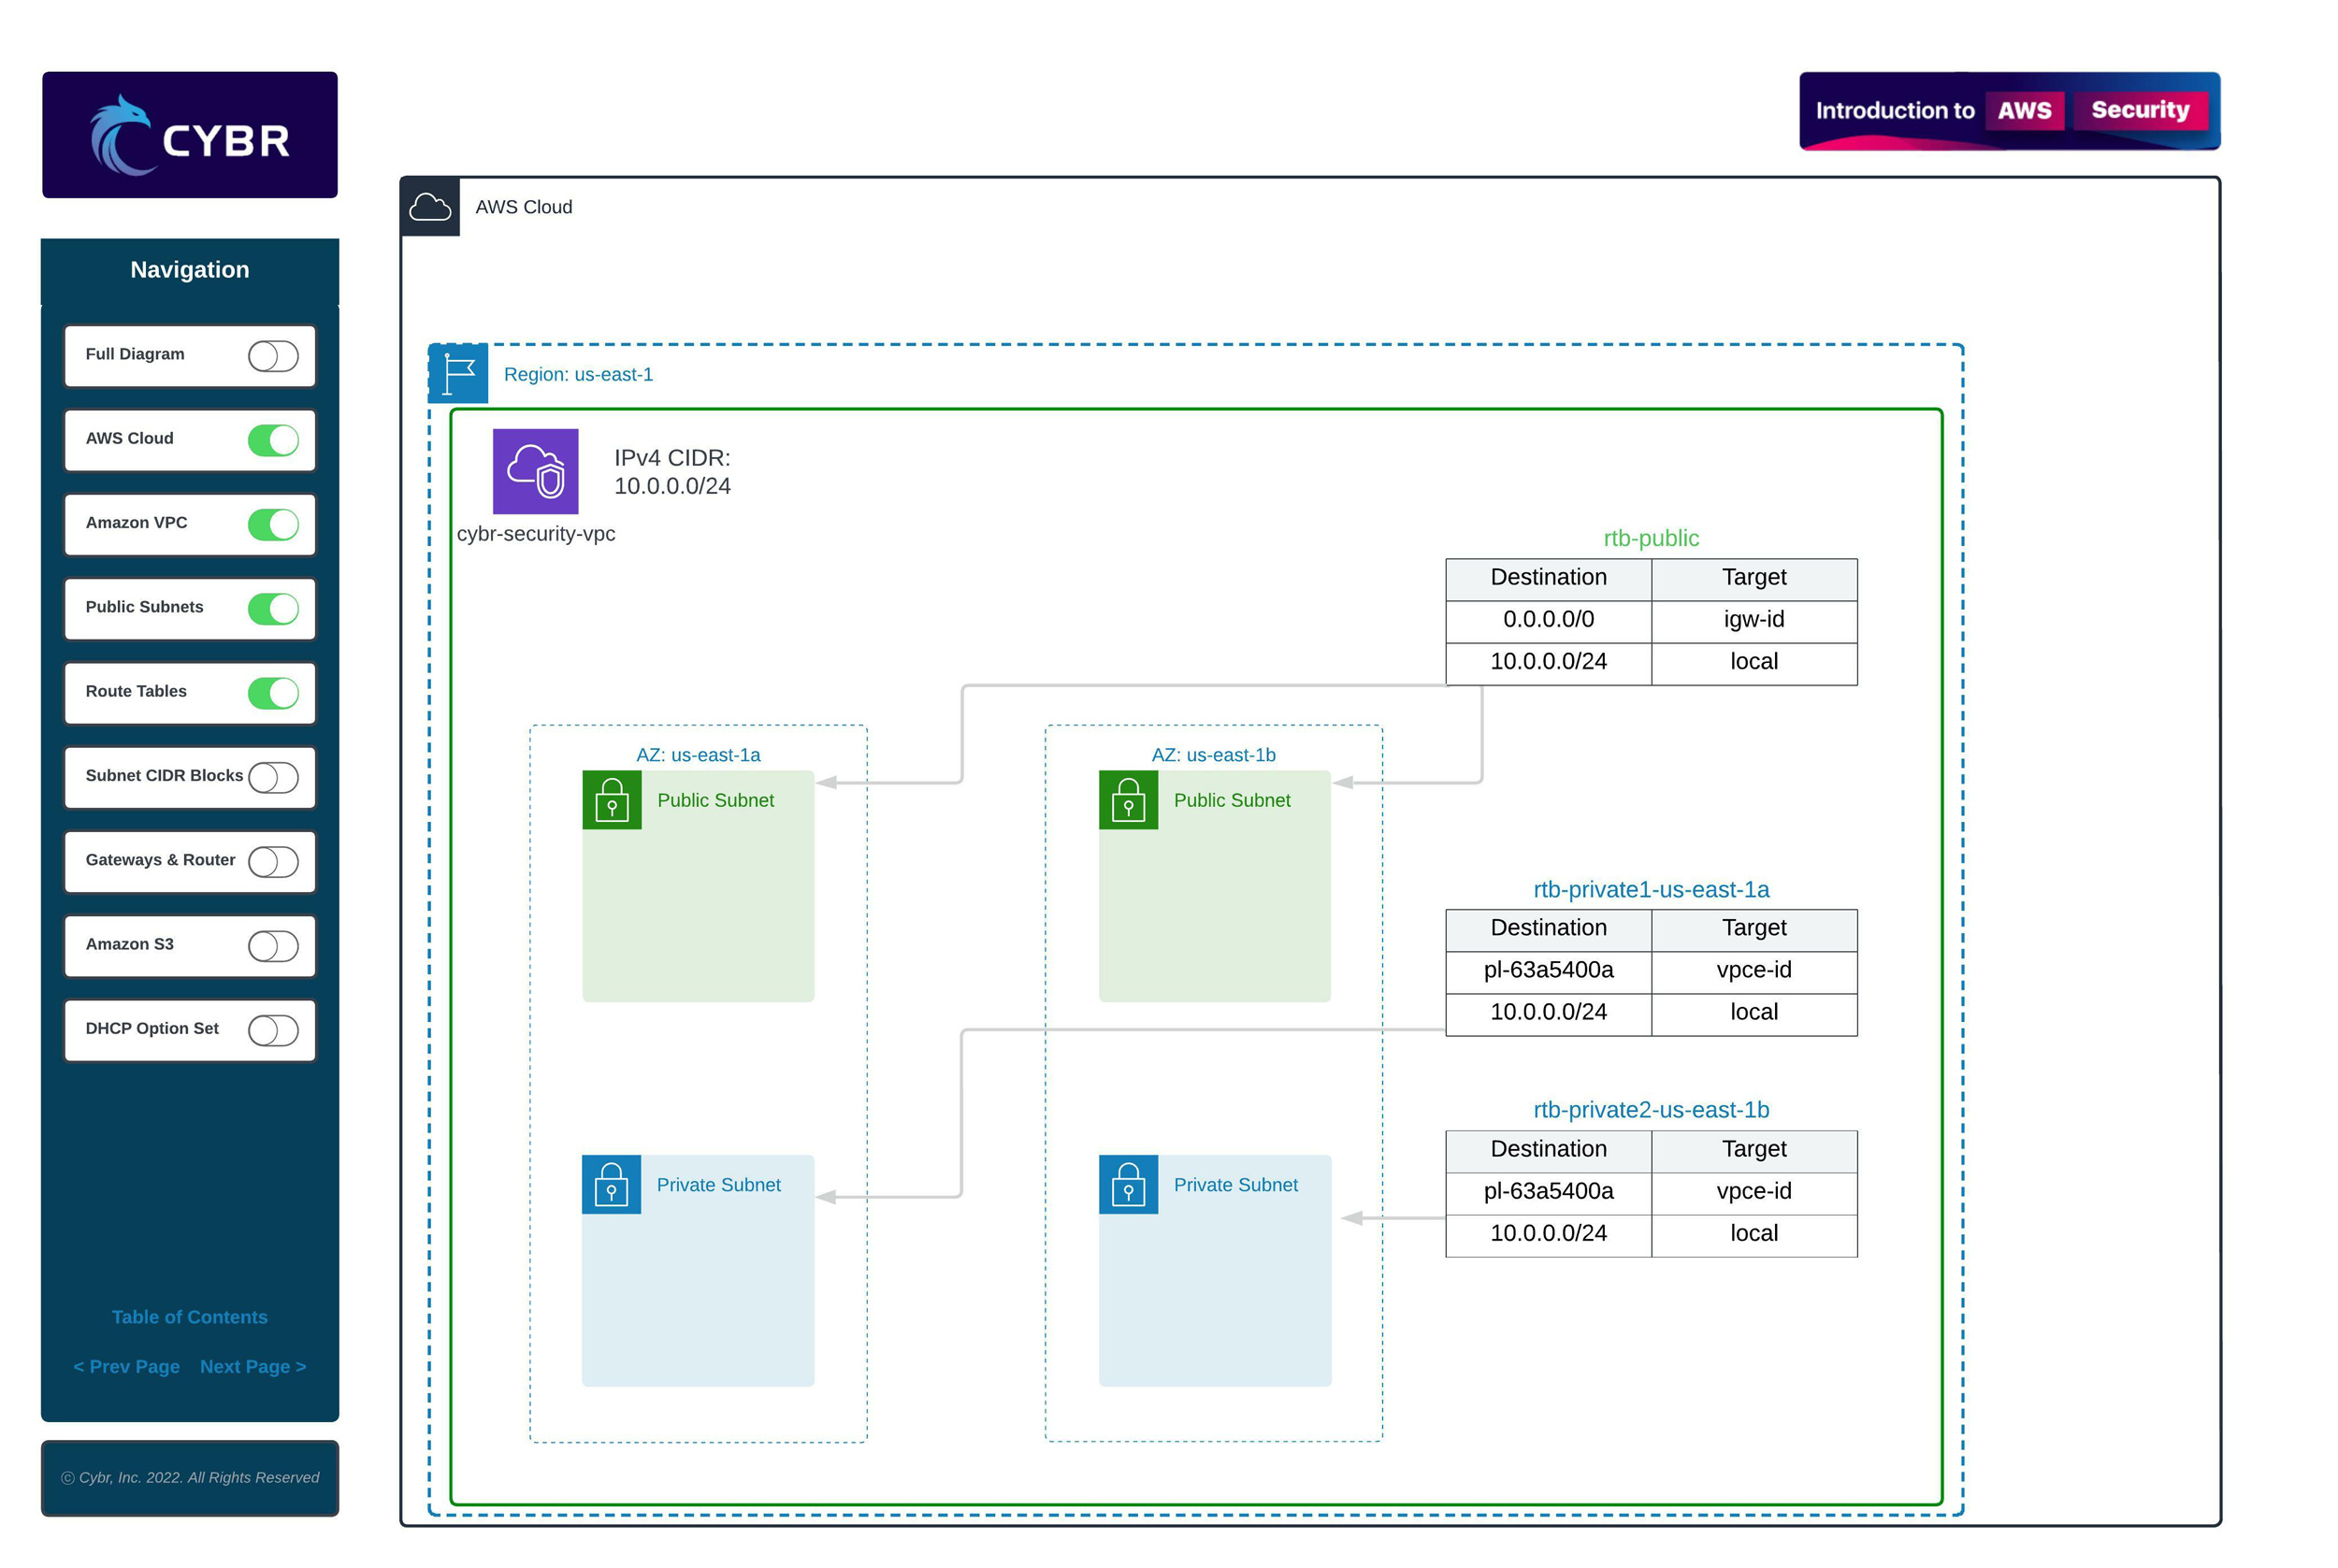
We then have three route tables:
- 1 public route table
- 2 private route tables for each AZ
We’re also going to create an Internet Gateway (IGW) and a VPC Endpoint for S3 connection (VPCE-S3).
If we hover over the IGW and VPCE-S3 resources, we can see that the IGW is only linked to the public route table, and it’s linked to two of the subnets — one in each AZ. These are going to end up being our public subnets since they will have routes to the Internet Gateway.
The S3 endpoint, on the other hand, is only connected to the private route tables. We can see those route tables link to the other two subnets — again one in each AZ. Those subnets are not linked to the IGW, which means they are going to be private subnets. The only “link” we are creating is to our Amazon S3 resources.

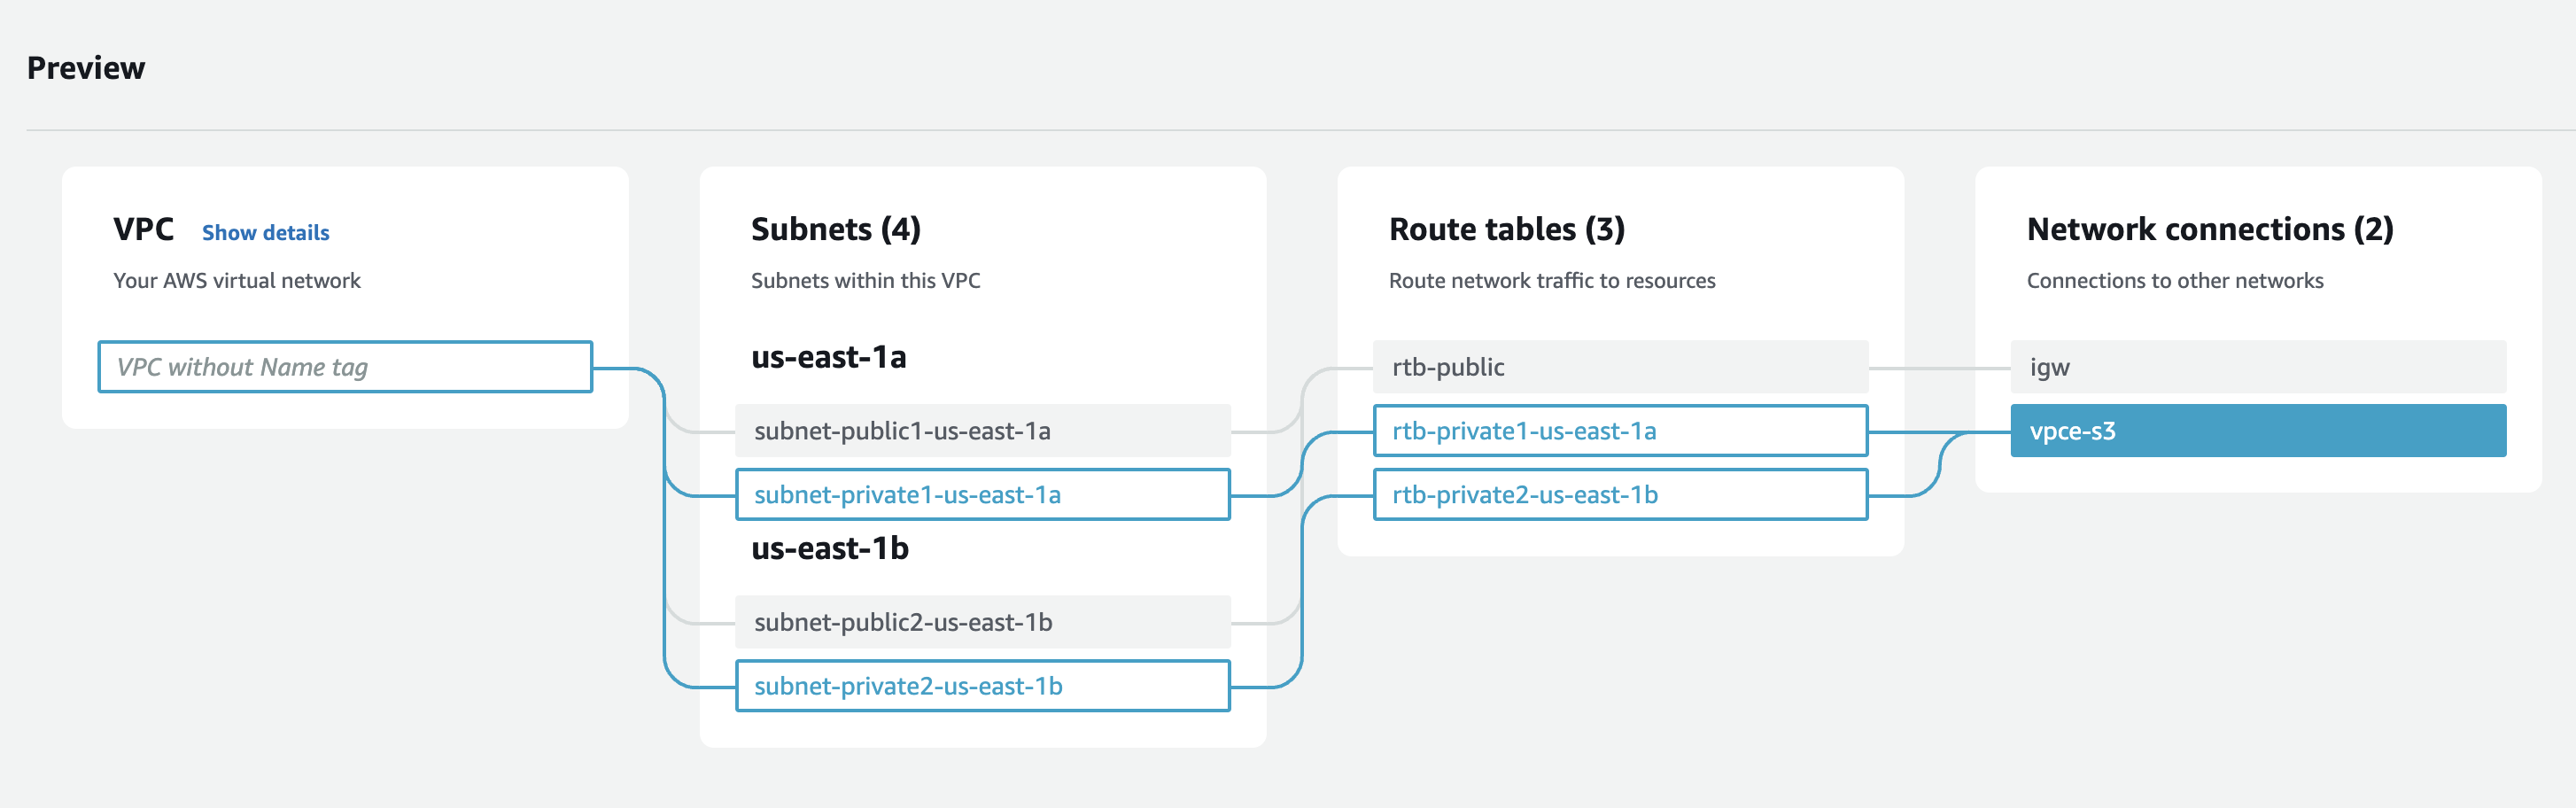
As we can see, these route tables play a critical role in creating network segmentation. They essentially direct traffic which means that properly configuring them is very important.
Isolating different subnets like this allows you to control damage in case of a security incident. Even if an attacker is able to breach one of your public subnets, they will not be able to laterally move between subnets, or at least you will make it much harder for them to do that, by which point hopefully monitoring and alerting notify your security team so they can take action.
Now, if, instead, we select “VPC Only” as our creation option, then we lose this visualization feature since AWS doesn’t yet know what other resources we will create.

This can still be a useful option if you’re not yet exactly sure how you’re going to configure this VPC, and you just want to get started.
To speed up this lesson, though, let’s go ahead and create with the “VPC and more” option so we can create it all in one action!

*A quick note if you’re following along in your own account: none of the resources we’re creating with this lesson will cost you money on their own. What I mean is that AWS does not charge for VPCs, subnets, Internet Gateways, or even Gateway endpoints for S3. With that said, if you do have traffic flowing through those gateways, that’s when you can start to accrue very small charges. All that to say: if you follow step-by-step what we’re doing in this lesson, you won’t be billed for anything. **
VPC Settings Breakdown
Naming resources
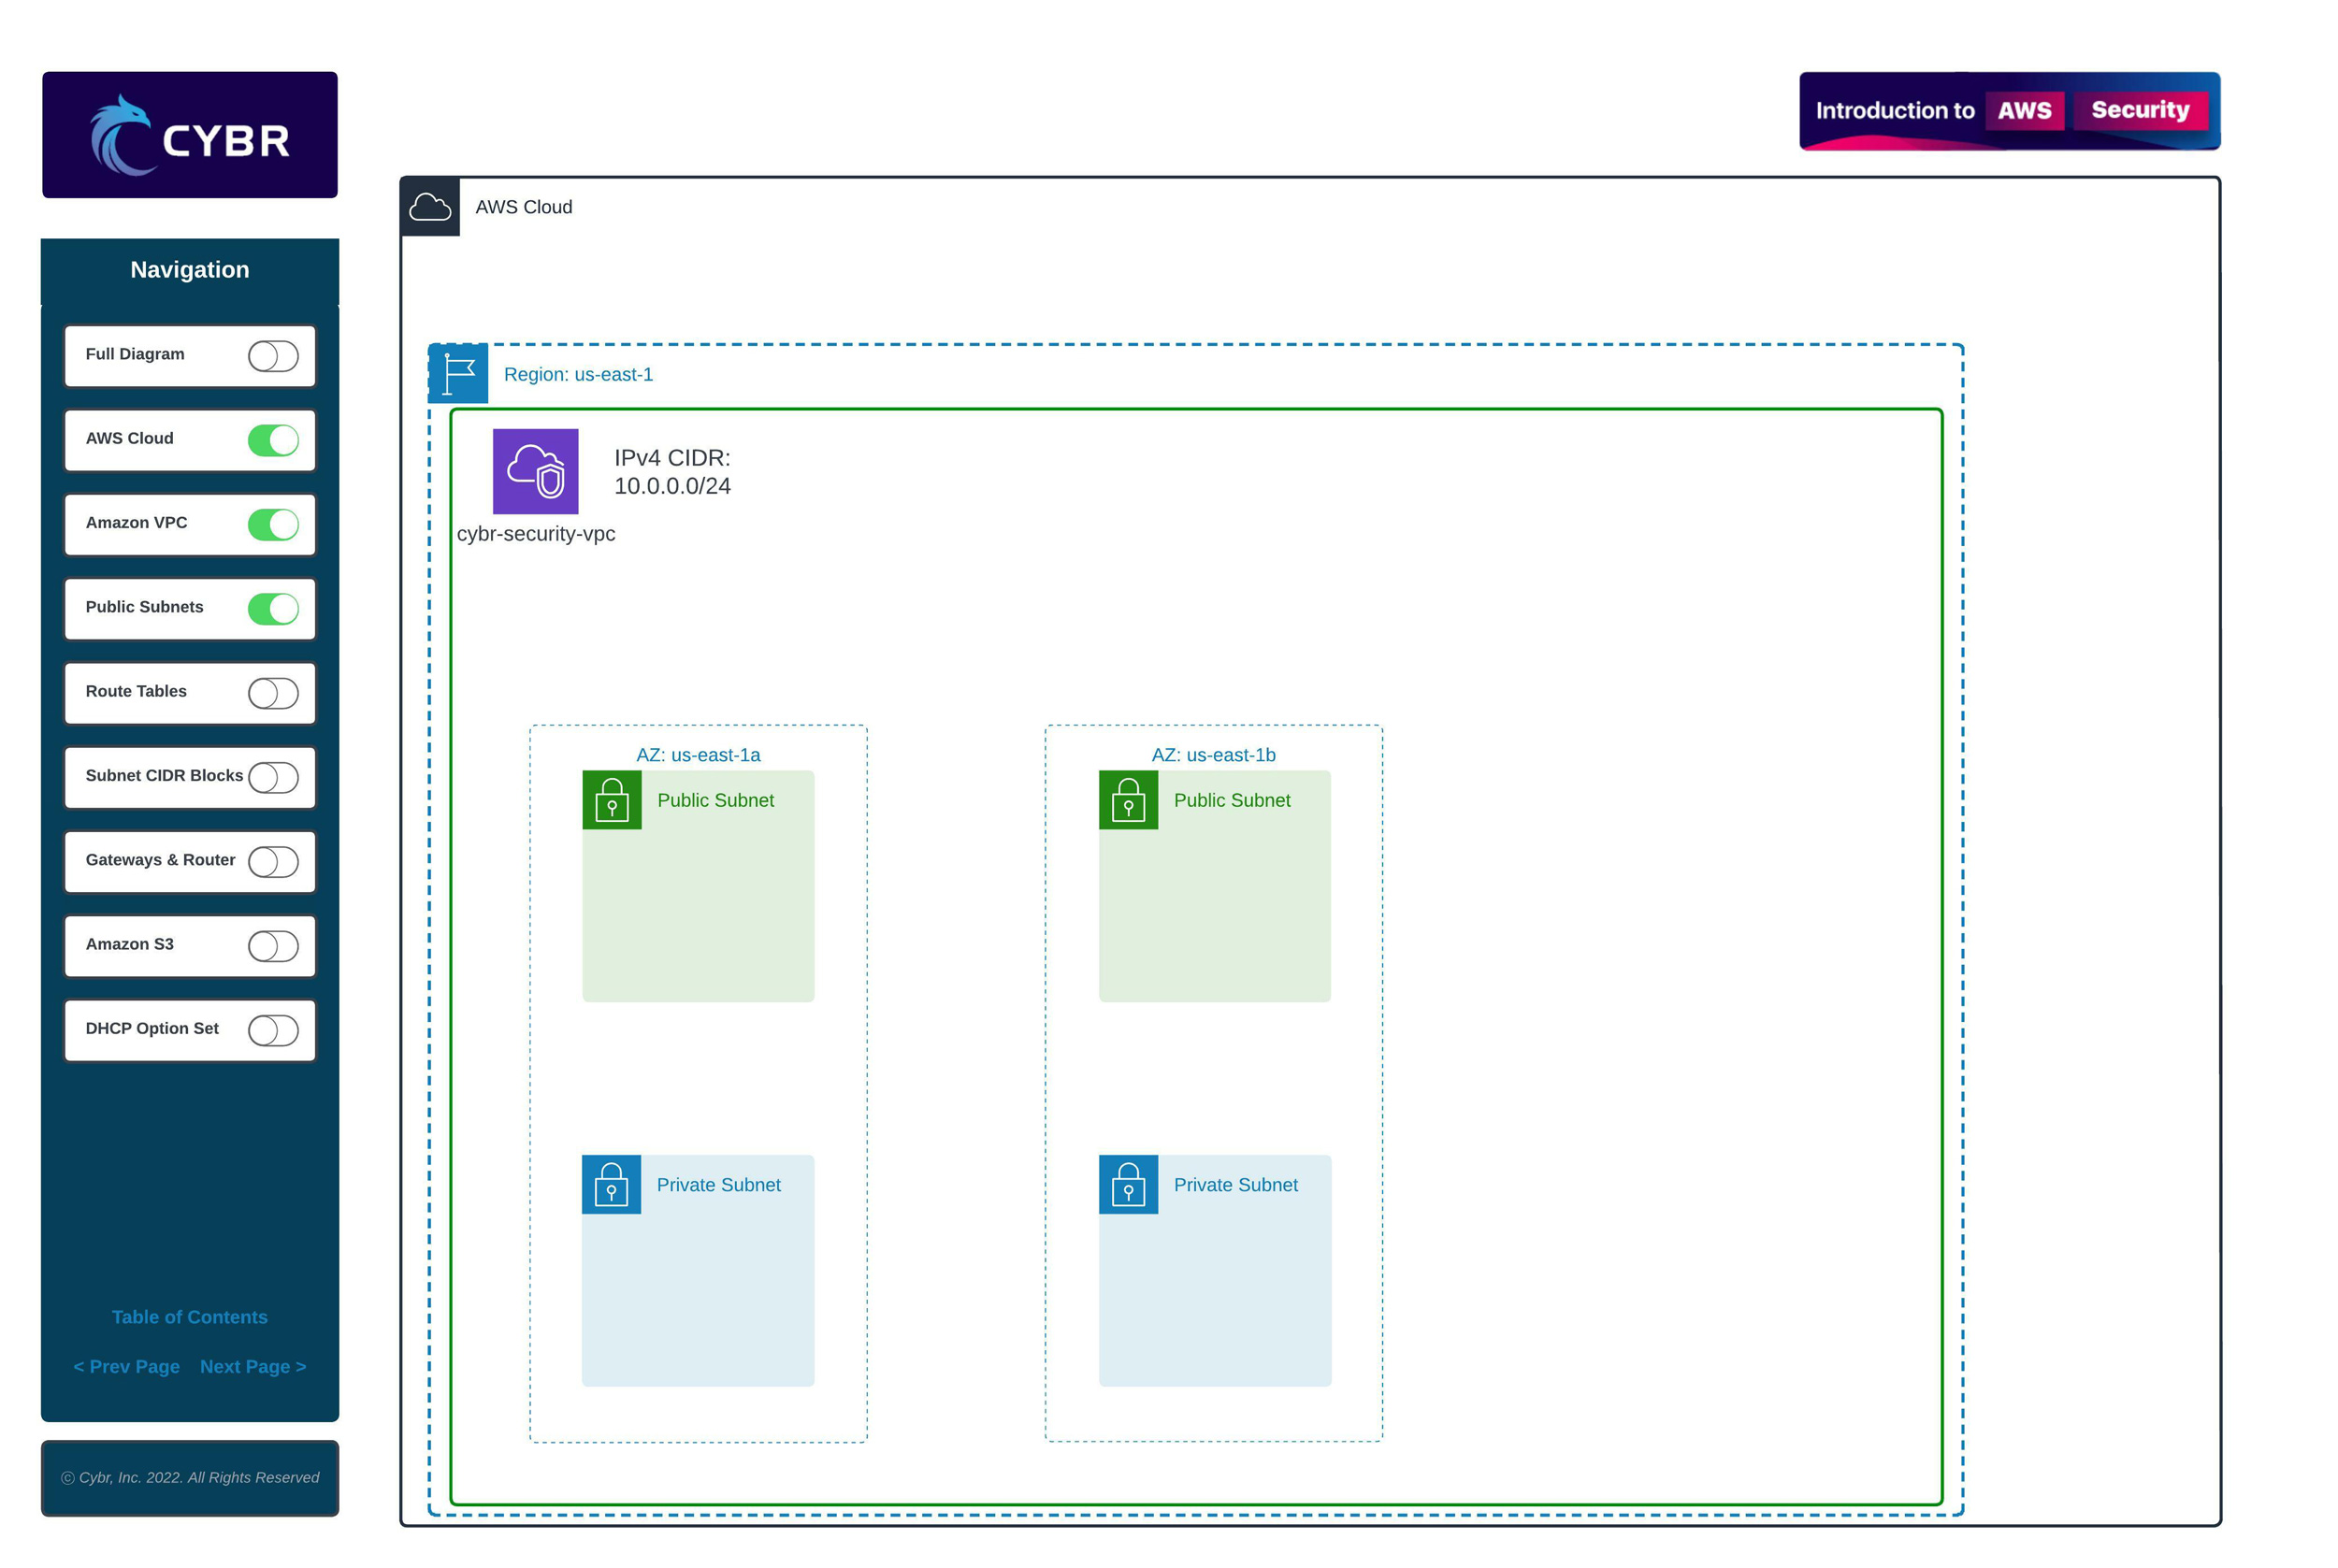
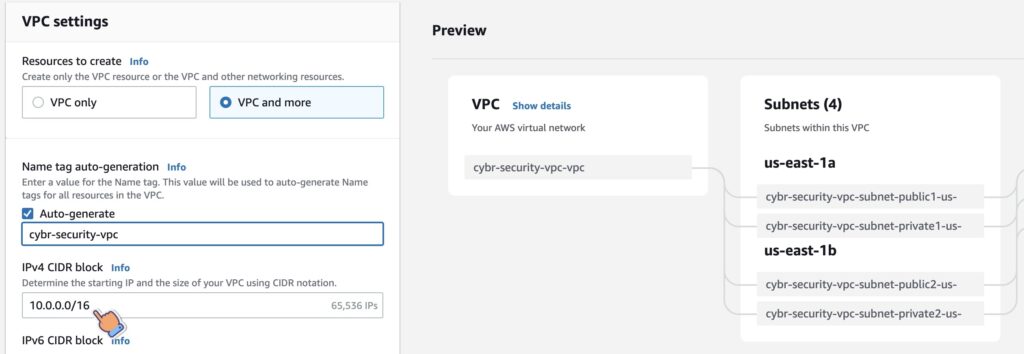
Let’s give our resources a name so that we can keep them organized. With “Auto-generate” selected, feel free to type in whatever name you’d like. I’m naming mine “cybr-security-vpc.”
As you can see, it auto-generates tag names for all of our other resources based on this name:
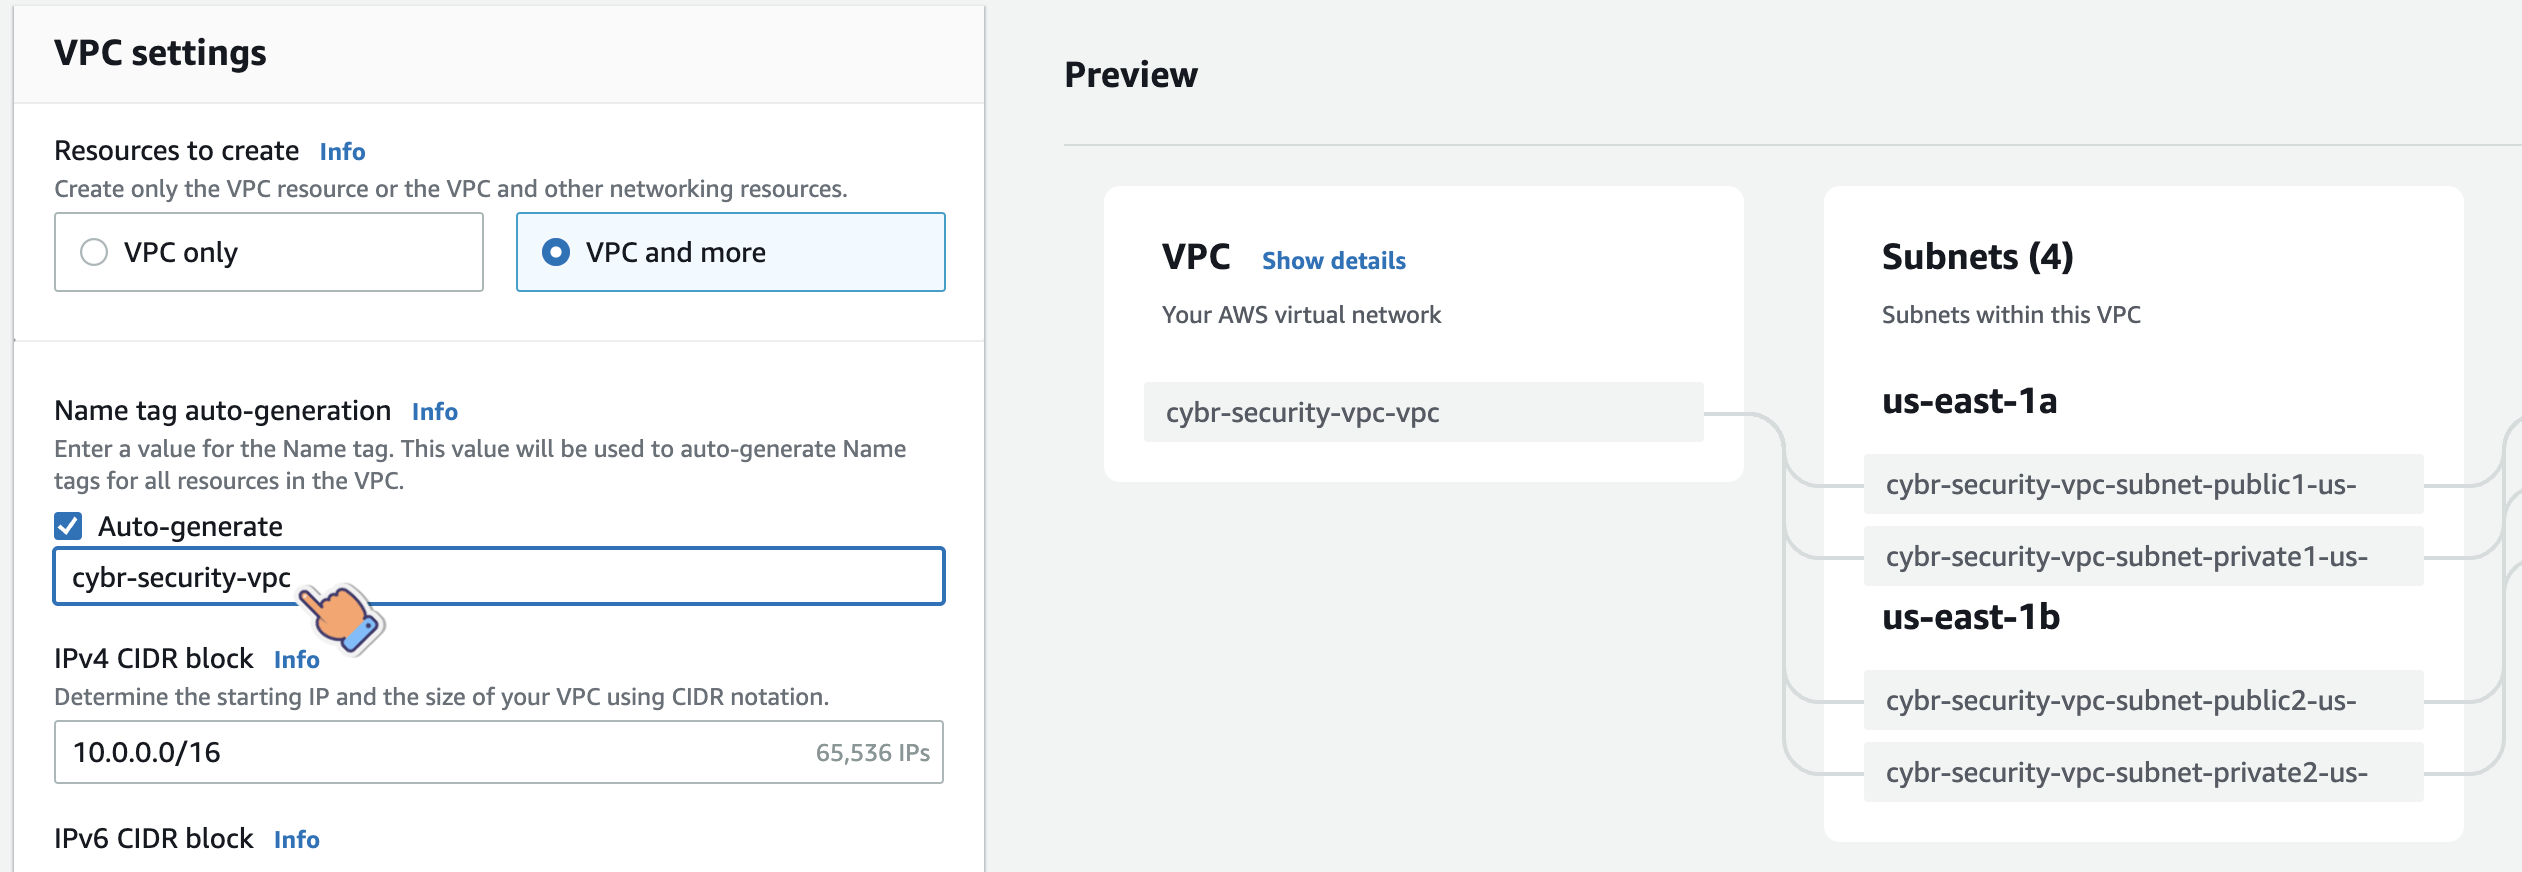
Choosing a CIDR block
We can then give it an IPv4 CIDR block, but we see that by default AWS recommends 10.0.0.0/16. Let’s go ahead and change that to 10.0.0.0/24 just to see how it reduces the available IP addresses to 256. We can keep it at that for this lesson.
We won’t be needing IPv6 for this, so leave it to the default of “No IPv6 CIDR block.”
Tenancy Options
Next, we’re asked for a Tenancy option.
Tenancy dictates whether you want your resources launched in a shared tenancy environment, or whether you need them to run on dedicated hardware.
The cloud, by default, is a shared tenancy environment which is what helps keeps costs low. We’ll want to leave it to default because otherwise, the costs go significantly higher for resources we would launch in this VPC. Using dedicated hardware is only useful if your organization is very paranoid or if it’s required to do that by regulations. For the vast majority of people, using shared tenancy is the way to go.
Selecting Availability Zones (AZs)
We can then select the number of Availability Zones we want to provision our subnets into, which by default is 2. Let’s leave it at that.

We can also customize which AZs we want to launch into. This only really matters once you’ve got subnets already created and resources already launched. At this stage, the defaults are just fine, because there’s going to be no noticeable difference in the AZs.
Configuring Subnets
Then, we can select the number of public subnets. In this case, we can either do 0 or 2. If we don’t need any publicly accessible resources, then we don’t need to create public subnets. In this case, let’s leave it to 2, because we do want public subnets.
The same applies for private subnets: we can have 0, 2, or 4 with this specific configuration. For what we’re doing here, let’s leave it to 2.


We can also customize subnet CIDR blocks. As you can see, AWS auto-populated this for us, but we could modify it if we needed to.
You’ll notice that they automatically incremented IPs:
- 10.0.0.0
- 10.0.0.16
- 10.0.0.128
- 10.0.0.144
This is all based on what’s available since we selected a 10.0.0.0/24 at the beginning of this process. If we had changed this initial CIDR block, these values would be different.
This is just fine for what we’re doing, so let’s leave it be!
NAT vs. Internet vs S3 Gateways
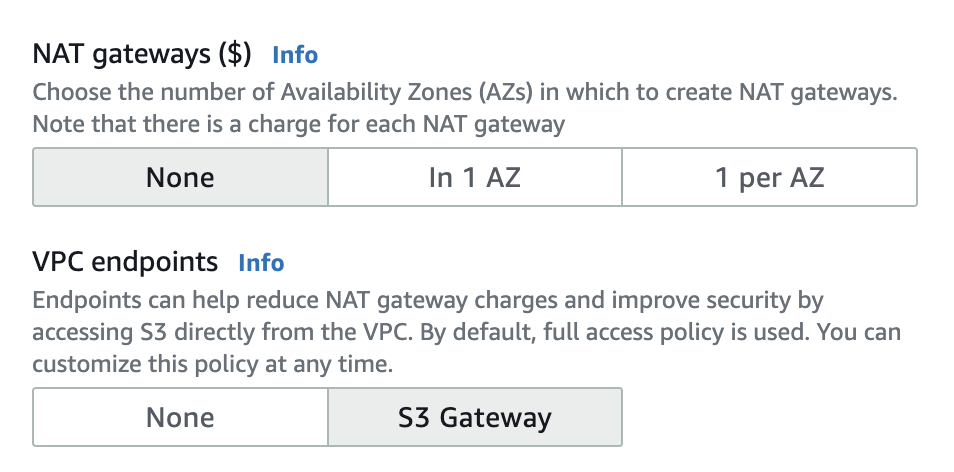
Now, we’re asked if we want any NAT Gateways. Notice that there’s a $ sign next to it. That’s because NAT Gateways do cost money, so I recommend leaving this to None for this lesson. You could, however, either create a NAT Gateway in 1 AZ, or 1 per AZ.
NAT Gateways are not the same as Internet Gateways, and this is an important distinction to understand. The benefits that private subnets give us also create a problem. When you launch resources in private subnets, they have no way of communicating with the open Internet. What if you need them to download updates and packages from time to time? They wouldn’t be able to, unless we add a NAT Gateway. The NAT Gateway will make it possible for resources in private subnets to make outbound requests to the Internet, such as to download updates, but it would prevent inbound requests that weren’t initiated by this private resource.
That makes private subnets ideal for hosting critical and sensitive infrastructure that needs to be protected and isolated from the Internet, such as: databases and application servers.
This is different from Internet Gateways, which create an open route for inbound and outbound requests to happen freely in public subnets.
Public subnets are used mainly for services and instances you would typically place in a DMZ (Demilitarized Zone) in a traditional network, such as: web servers, proxies, mail servers and VPN endpoints. These are services that need to be constantly connected to the Internet.
So, again, let’s leave this off to avoid getting charged, but you would likely need some sort of NAT Gateway if you were actually launching resources in your private subnets — depending on your use case.
VPC Endpoints are also different from both NAT and Internet Gateways. The S3 Gateway Endpoint makes it possible to directly connect your VPC resources to S3 resources.
S3 resources reside outside of VPCs, so this is needed if any of your servers require access to data stored in S3, and it’s a great way to connect them securely.
As you can see, the fine print says that “By default, the full access policy is used. You can customize this policy at any time.” That’s outside the scope of this lesson, but I wanted to quickly point that out so you’re aware.
DNS Options and Tagging
Finally, we can enable DNS options and set additional tags, if we want to.

DNS options enabled DNS hostnames and DNS resolution, which is important for resources to be able to communicate.
DNS hostnames gives instances launched in public subnets that have public IP addresses a corresponding public DNS hostname.
DNS resolution enables Amazon DNS resolutions for your VPC. Amazon has its own DNS servers, and this is what we enable with this option.
Creating the VPC and Resources
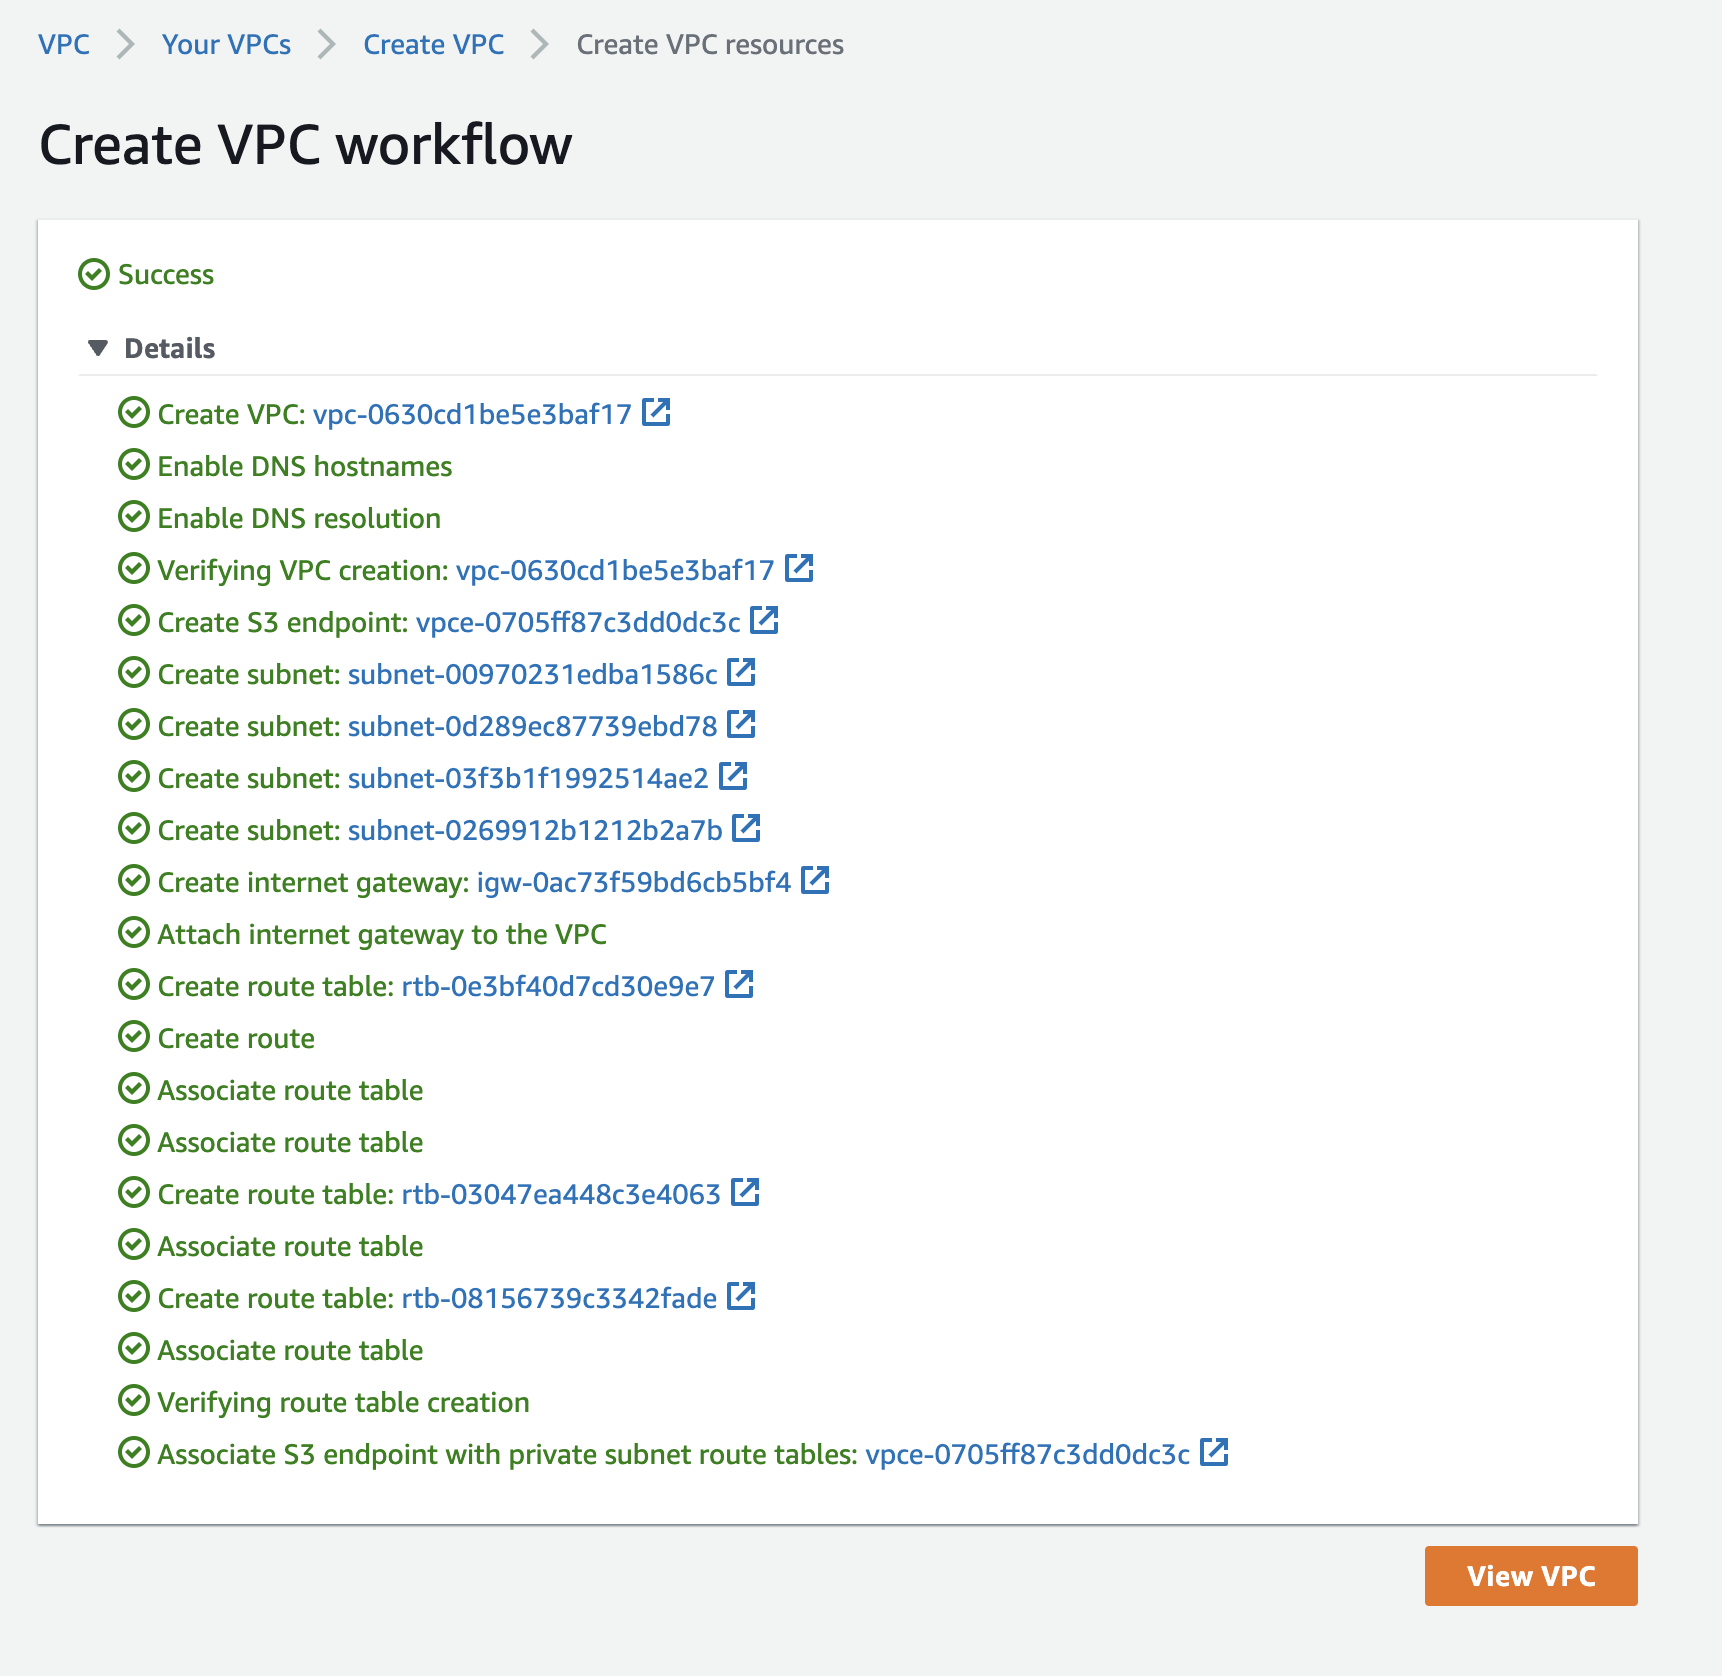
We’re now ready to create the VPC and these other resources! Click on “Create.”
Note: if you get an error that “the document is empty” it’s because your request timed out. Go back, refresh the page, re-enter the needed info, and re-create.
Now click on “View VPC” so that you can see your brand-new VPC!
Examining our newly created VPC and resources
If you select the VPC, you can see more information about what we just created:
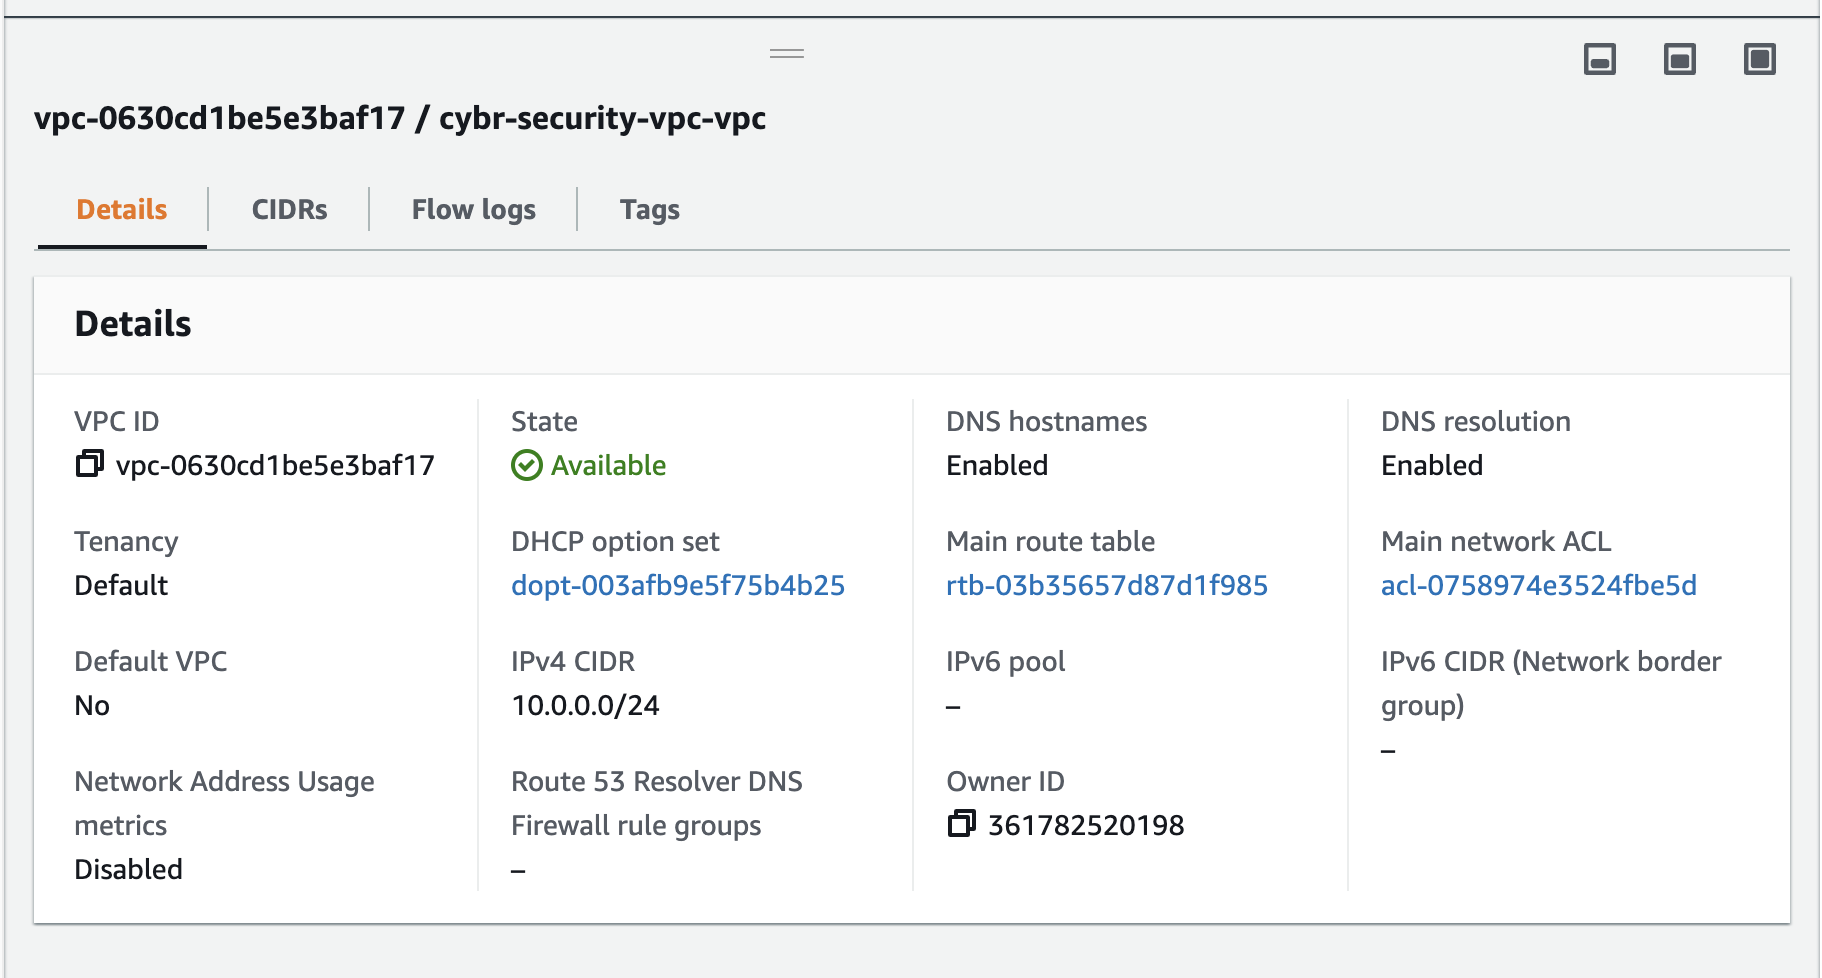
Keep in mind that this is just a very high level of what we’ve just created. This doesn’t tell us anything about the subnets or gateways, for example. What it does show us that’s useful is:
- VPC ID – this is a unique identifier
- Default VPC: no – this reminds us that we’re not looking at a default AWS-created VPC.
- IPv4 CIDR: 10.0.0.0/24 – this is the CIDR block for this entire VPC that we configured
- Main route table: rtb-03b35657d87d1f985 – this is the main route table we created that we’ll look at in a next lesson
- Owner ID – this is your account number, which only really matters when you are dealing with multiple AWS accounts to keep track
- Main network ACL: acl-0758974e3524fbe5d – this is the Network ACL, or NACL, which we’ll learn about in another lesson.
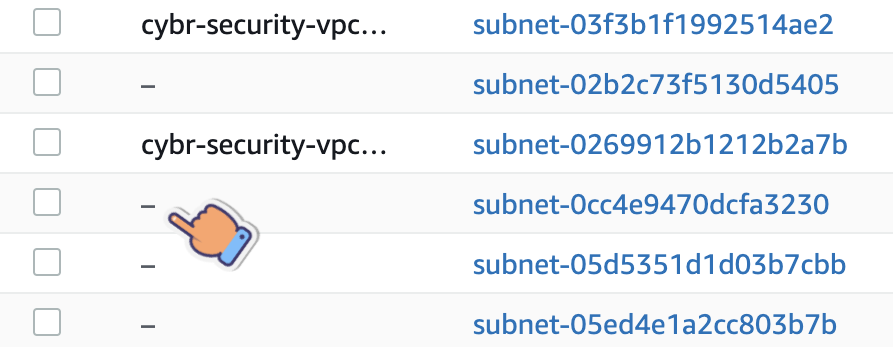
If we head over to the Subnets page, we will see the 4 subnets that were created, and we can tell that they’re the corresponding subnets based on their name, and based on the VPC ID.

If we go to the Route Tables page, we’ll see the 3 route tables that were created:

Clicking on the Internet Gateways menu item will show us the IGW we created:

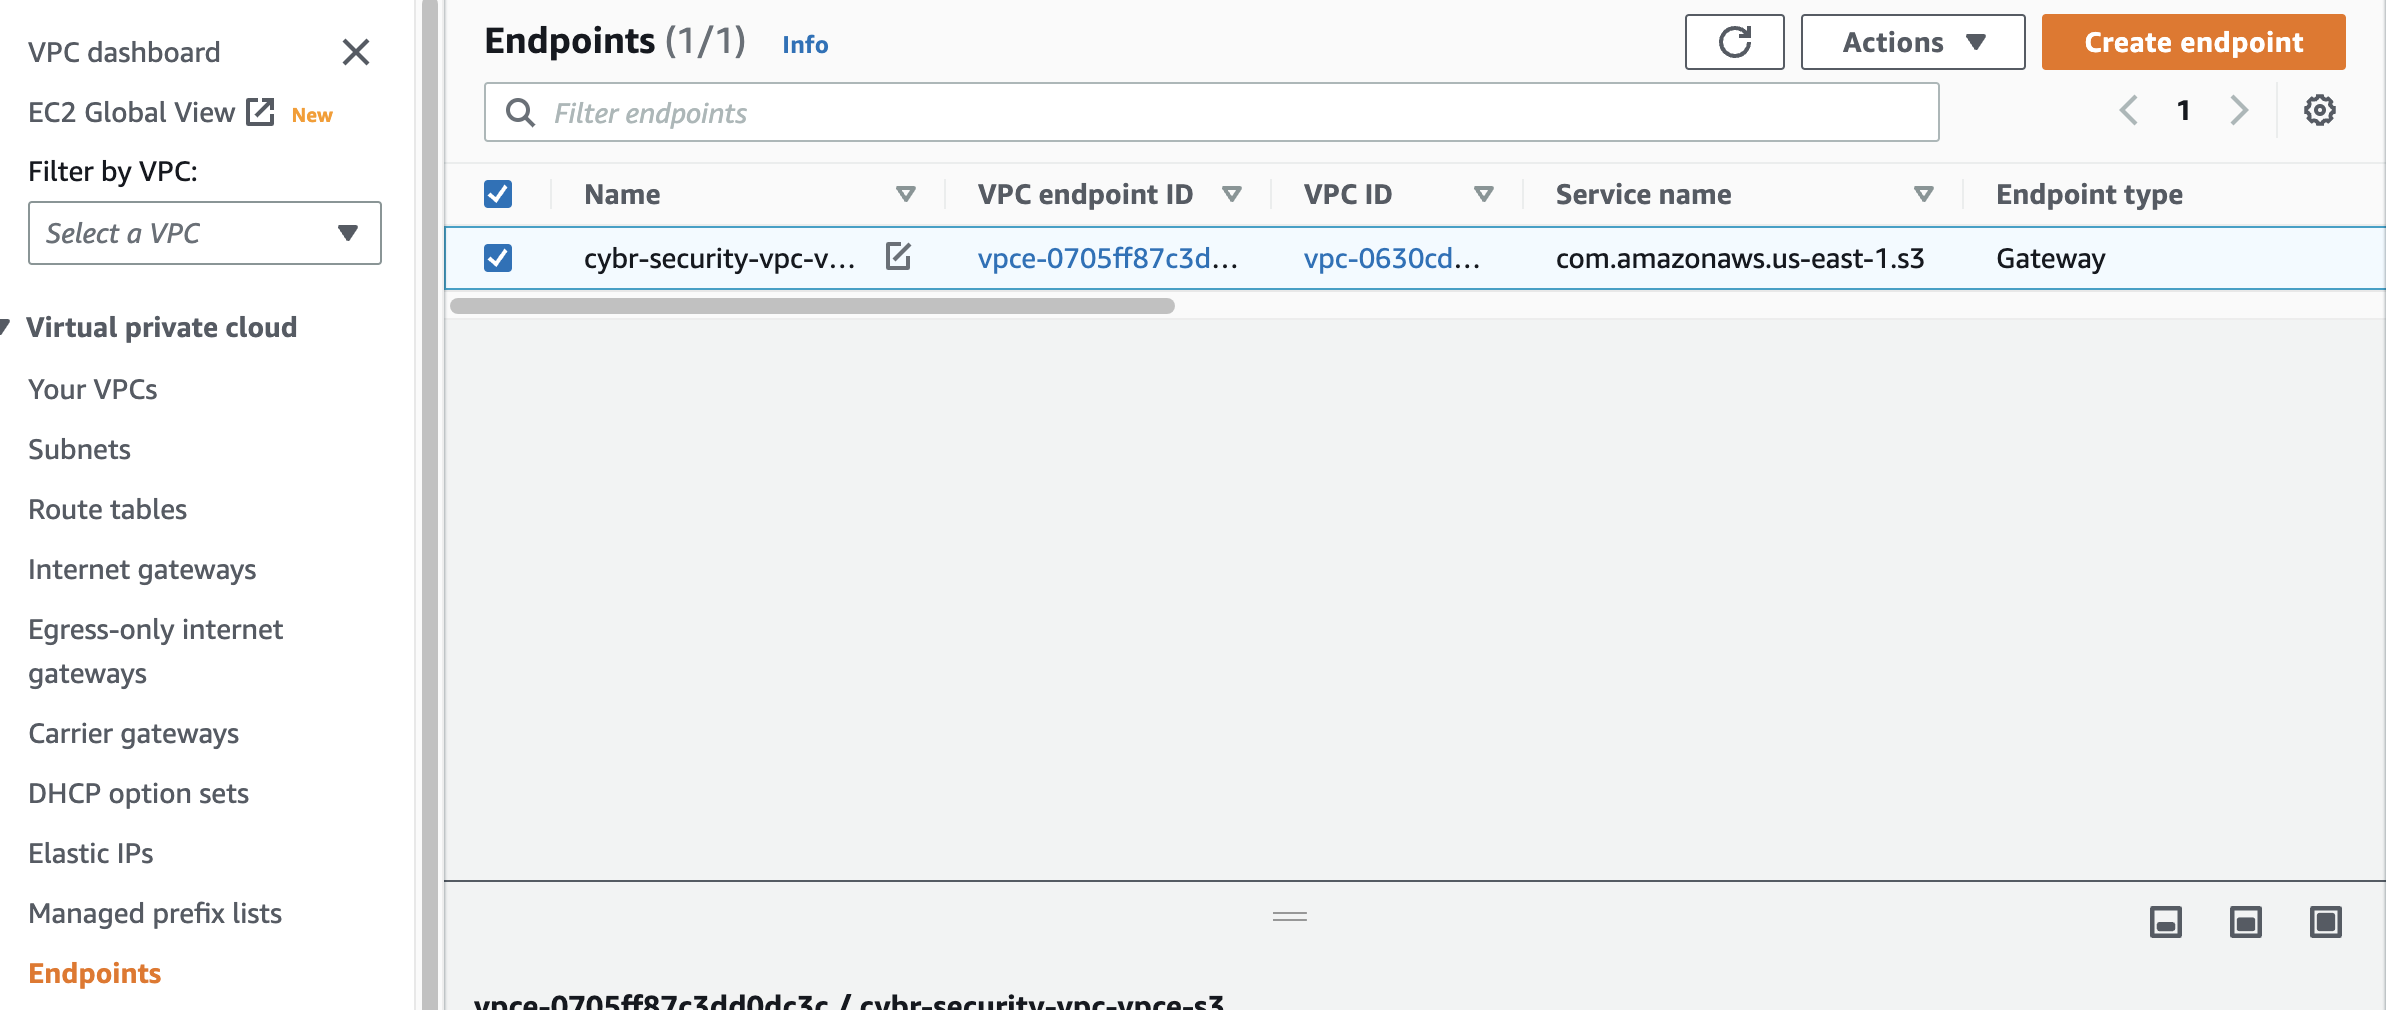
Finally, clicking on Endpoints in the menu will show the S3 endpoint we created:
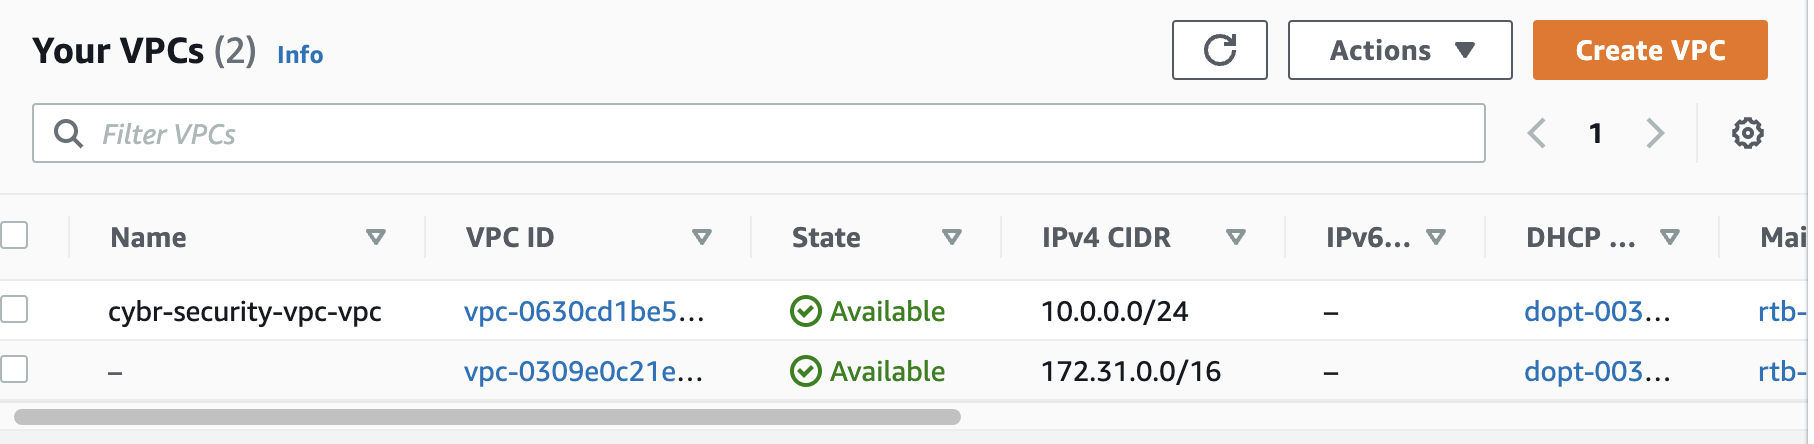
There you have it! These are all of the resources we created in this lesson. You’ll notice that there are other resources all named “-” and those are the resources that were auto-created by AWS for the default VPC.
Conclusion
Alright, that’s it for now. Go ahead and complete this lesson, and in the next lessons, we’ll dive deeper into route tables, gateways, endpoints, and their configurations.
VPC successfully created, no issues.
Great job, explanation was clear.