
Access the interactive diagram for this lesson here. (It may ask you to create a free account in order to view. You do not need paid features to view this course’s content so you can ignore that!)
Starting with this lesson, I highly recommend that you create your own AWS account in order to follow along if you don’t already have one. Some of the links in this lesson will only be accessible if you’re logged in to an AWS account, and following along is a better way of learning than simply watching me explain concepts. Creating an account is simple, so I’m not showing you how to do it, but if you need instructions, follow the steps on this page. None of what we do in this specific lesson will end up costing you money, so even though AWS asks for a payment method, you will not accrue any charges as long as you follow my steps.
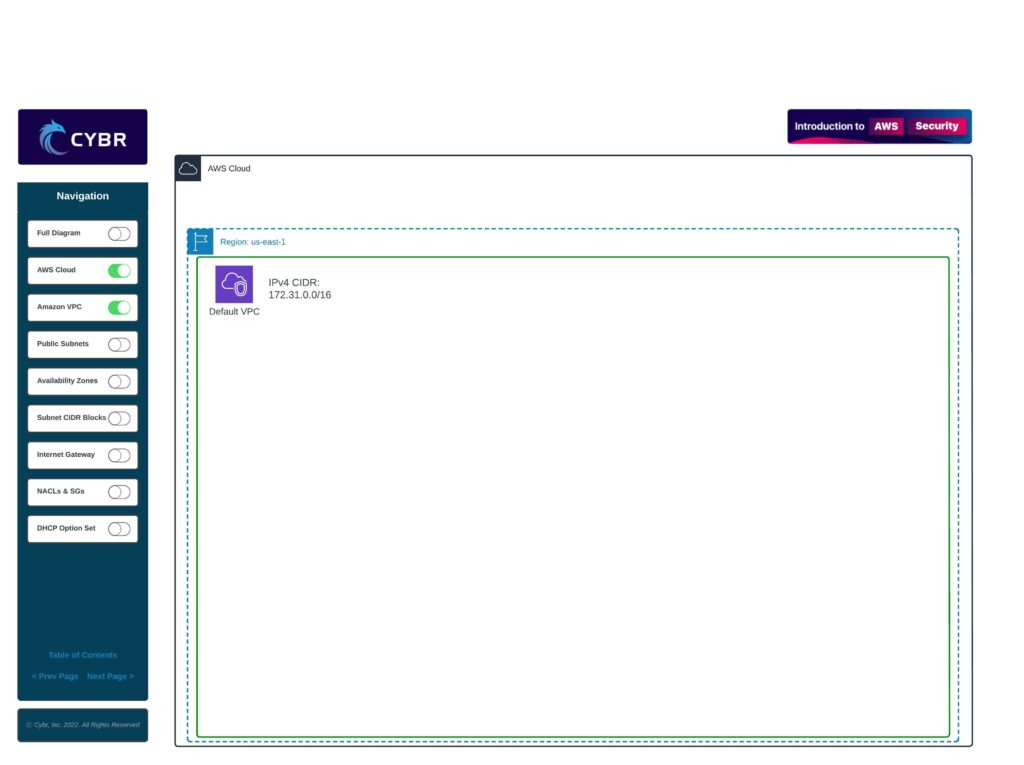
Default VPC
When you create your AWS account and start using your subscription, Amazon gives what they call a default VPC. This default VPC comes with pre-configured features and parameters to save you time and effort and to make it more beginner friendly.
If they didn’t have this default VPC, it would be overwhelming to a complete beginner. It provides a very quick and convenient way to get you started with AWS. However, in security, we tend to avoid using what is provided to us “by default” because defaults almost always create security holes.
Plus, when you’re dealing with this sort of environment, it’s preferable to have full control over how things are configured and set up.
In any case, let’s take a look at what this default VPC is and how it’s configured, and let’s also talk about some of the security concerns we might face if we end up using it.
CIDR Blocks
In detail, you get one “default” VPC in each AWS region, with a /16 IP block assigned to it.
If you’re not familiar with what /16 refers to, consider checking out our Networking Fundamentals course where we explain what CIDR blocks are. The long story short is that CIDR defines which IP addresses and how many host IP addresses will be allowed on the network. In the case of /16, we are reserving 16 bits for the network mask, and we can have up to 65,536 private IPv4 addresses.
Because this default VPC uses the IPv4 address of 172.31.0.0 with a /16, that means the resources we would launch in this VPC could have IP addresses of 172.31.x.x.
You’ll remember that once we create a VPC, we also need to create subnets. AWS automatically creates a default public subnet with a /20 in each Availability Zone for that specific region. That means you can launch about 4,096 hosts in each subnet. I say about, because AWS reserves some of those IP addresses for services behind the scenes.
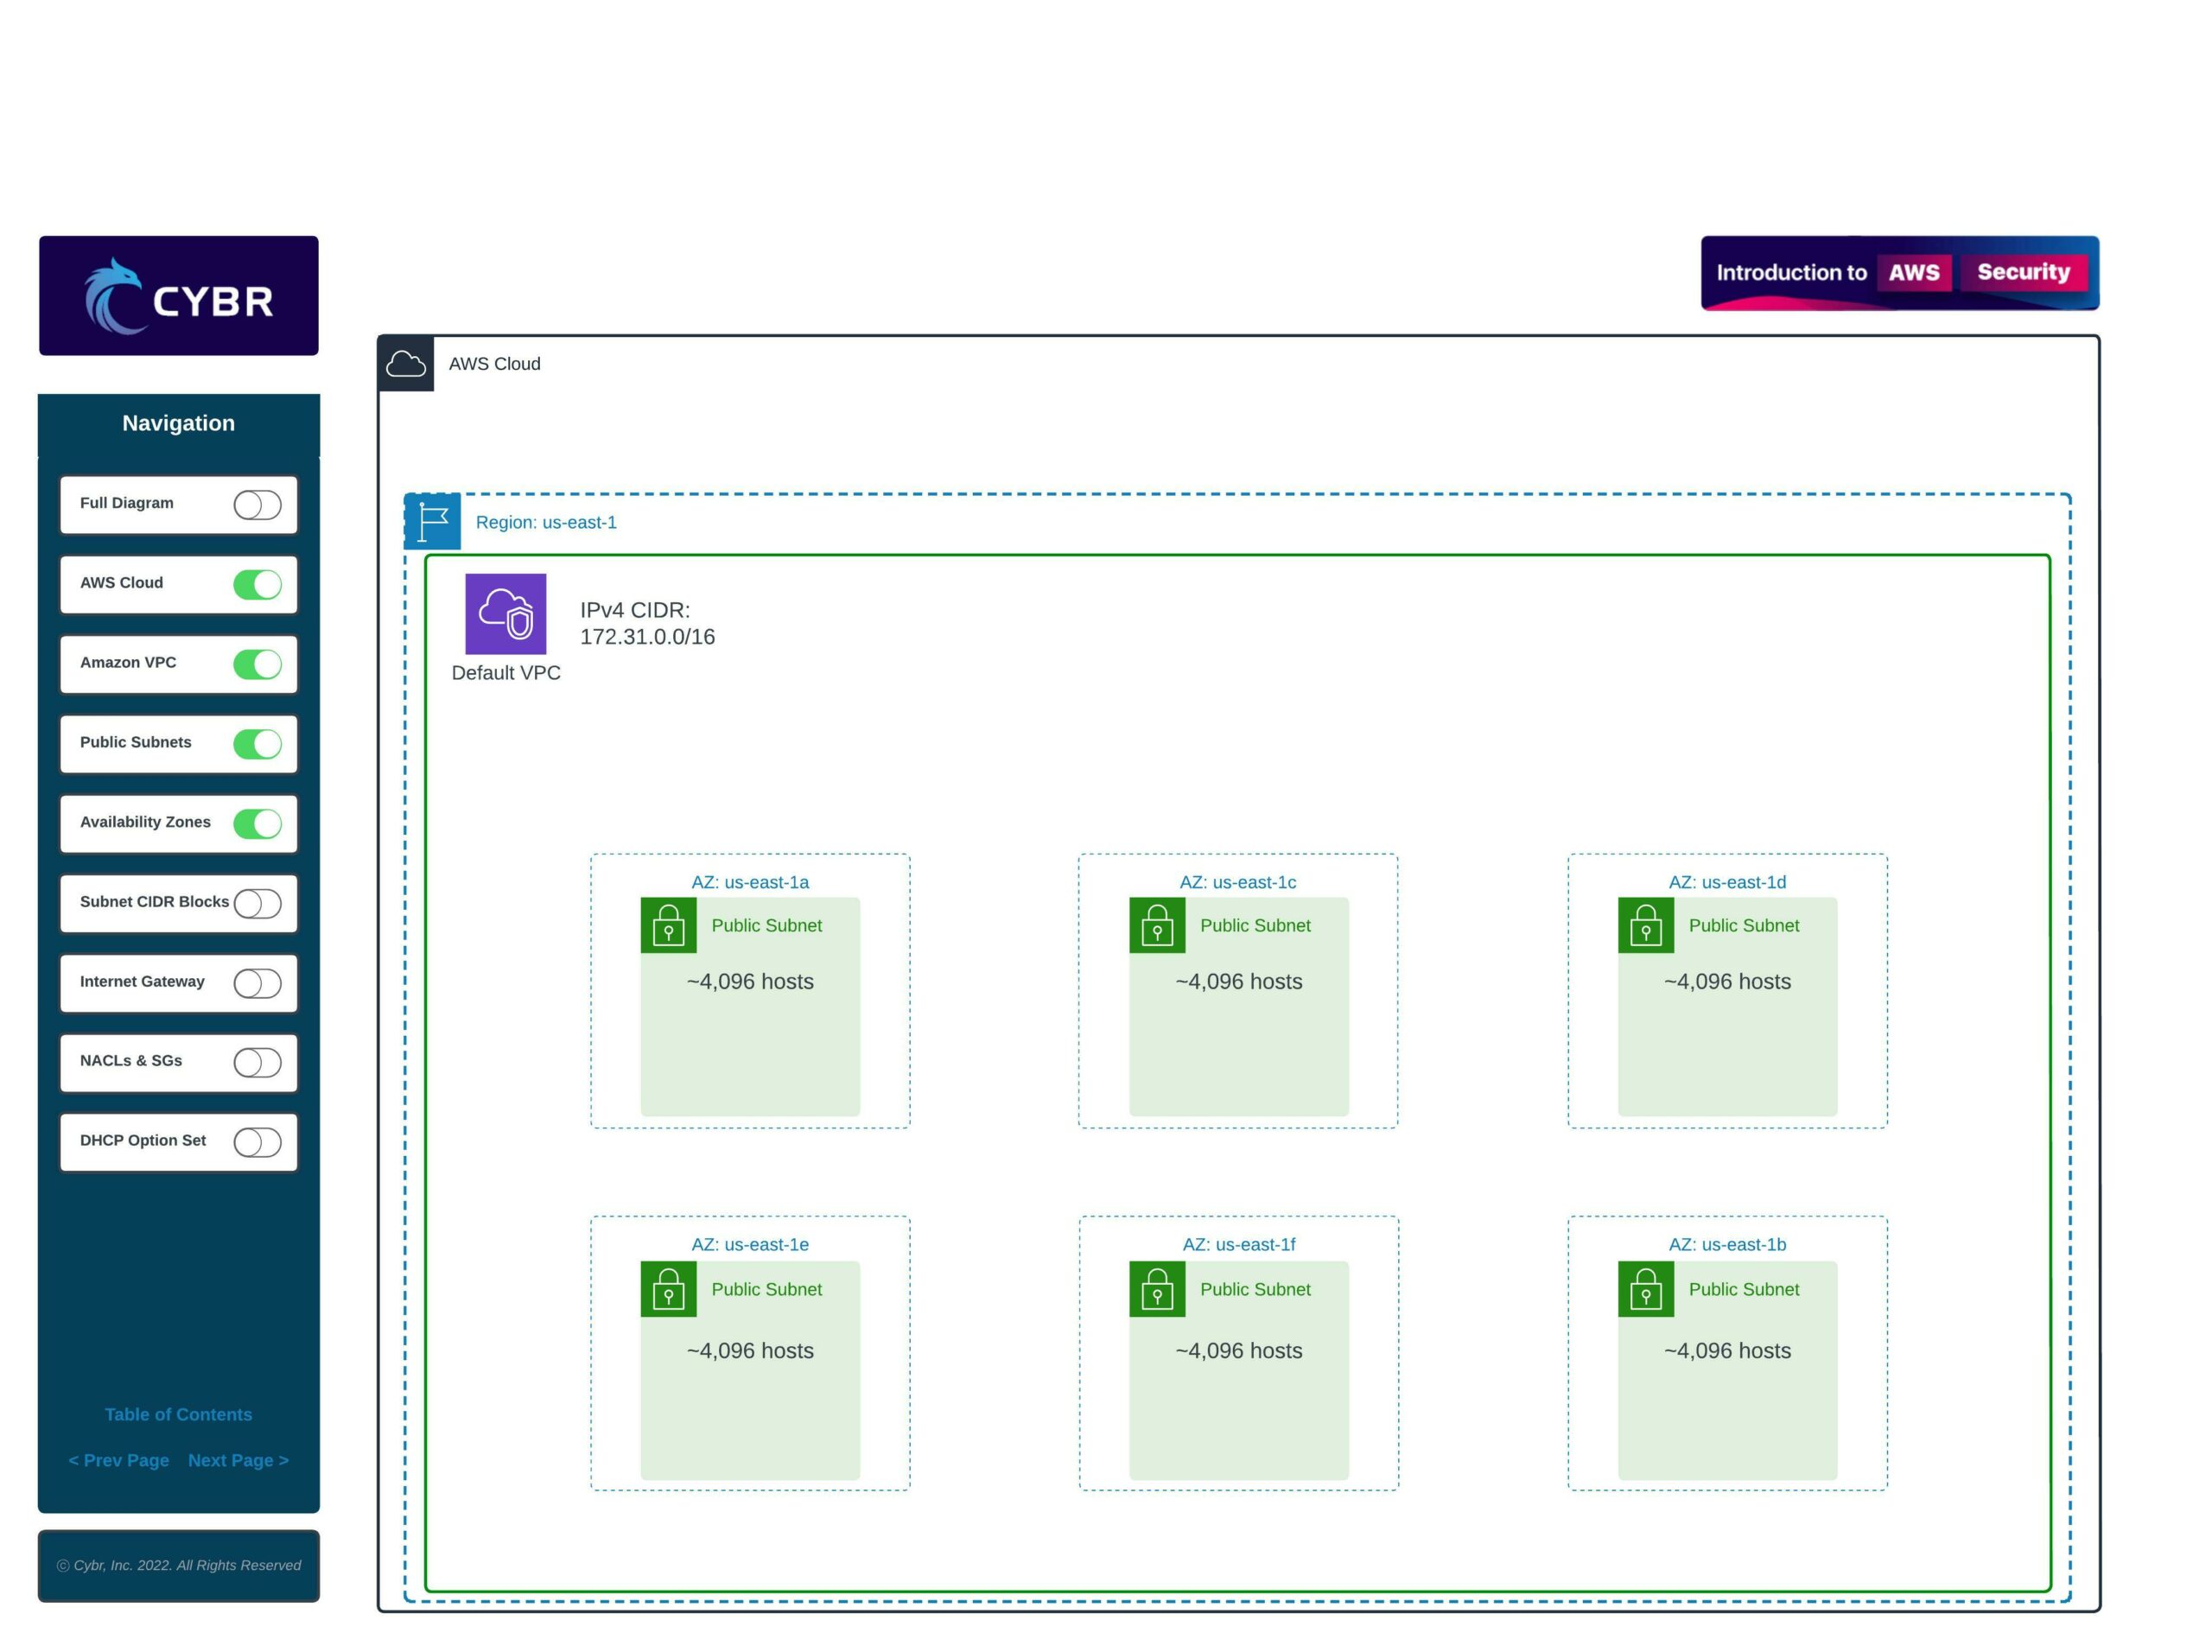
Those subnets could look like this:
- Subnet 1:
172.31.0.0/20 - Subnet 2:
172.31.16.0/20 - Subnet 3:
172.31.32.0/20
Where resources launched in subnet 1 would have IP addresses of 172.31.0.x, resources in subnet 2 would have IP addresses of 172.31.16.x, and so on…

CIDR is important to understand when setting up VPCs but it’s not going to be an area of focus for security purposes, so we won’t dive further into explaining that in this course, but here are additional resources that can help you learn more if you’re interested: resource 1, resource 2.
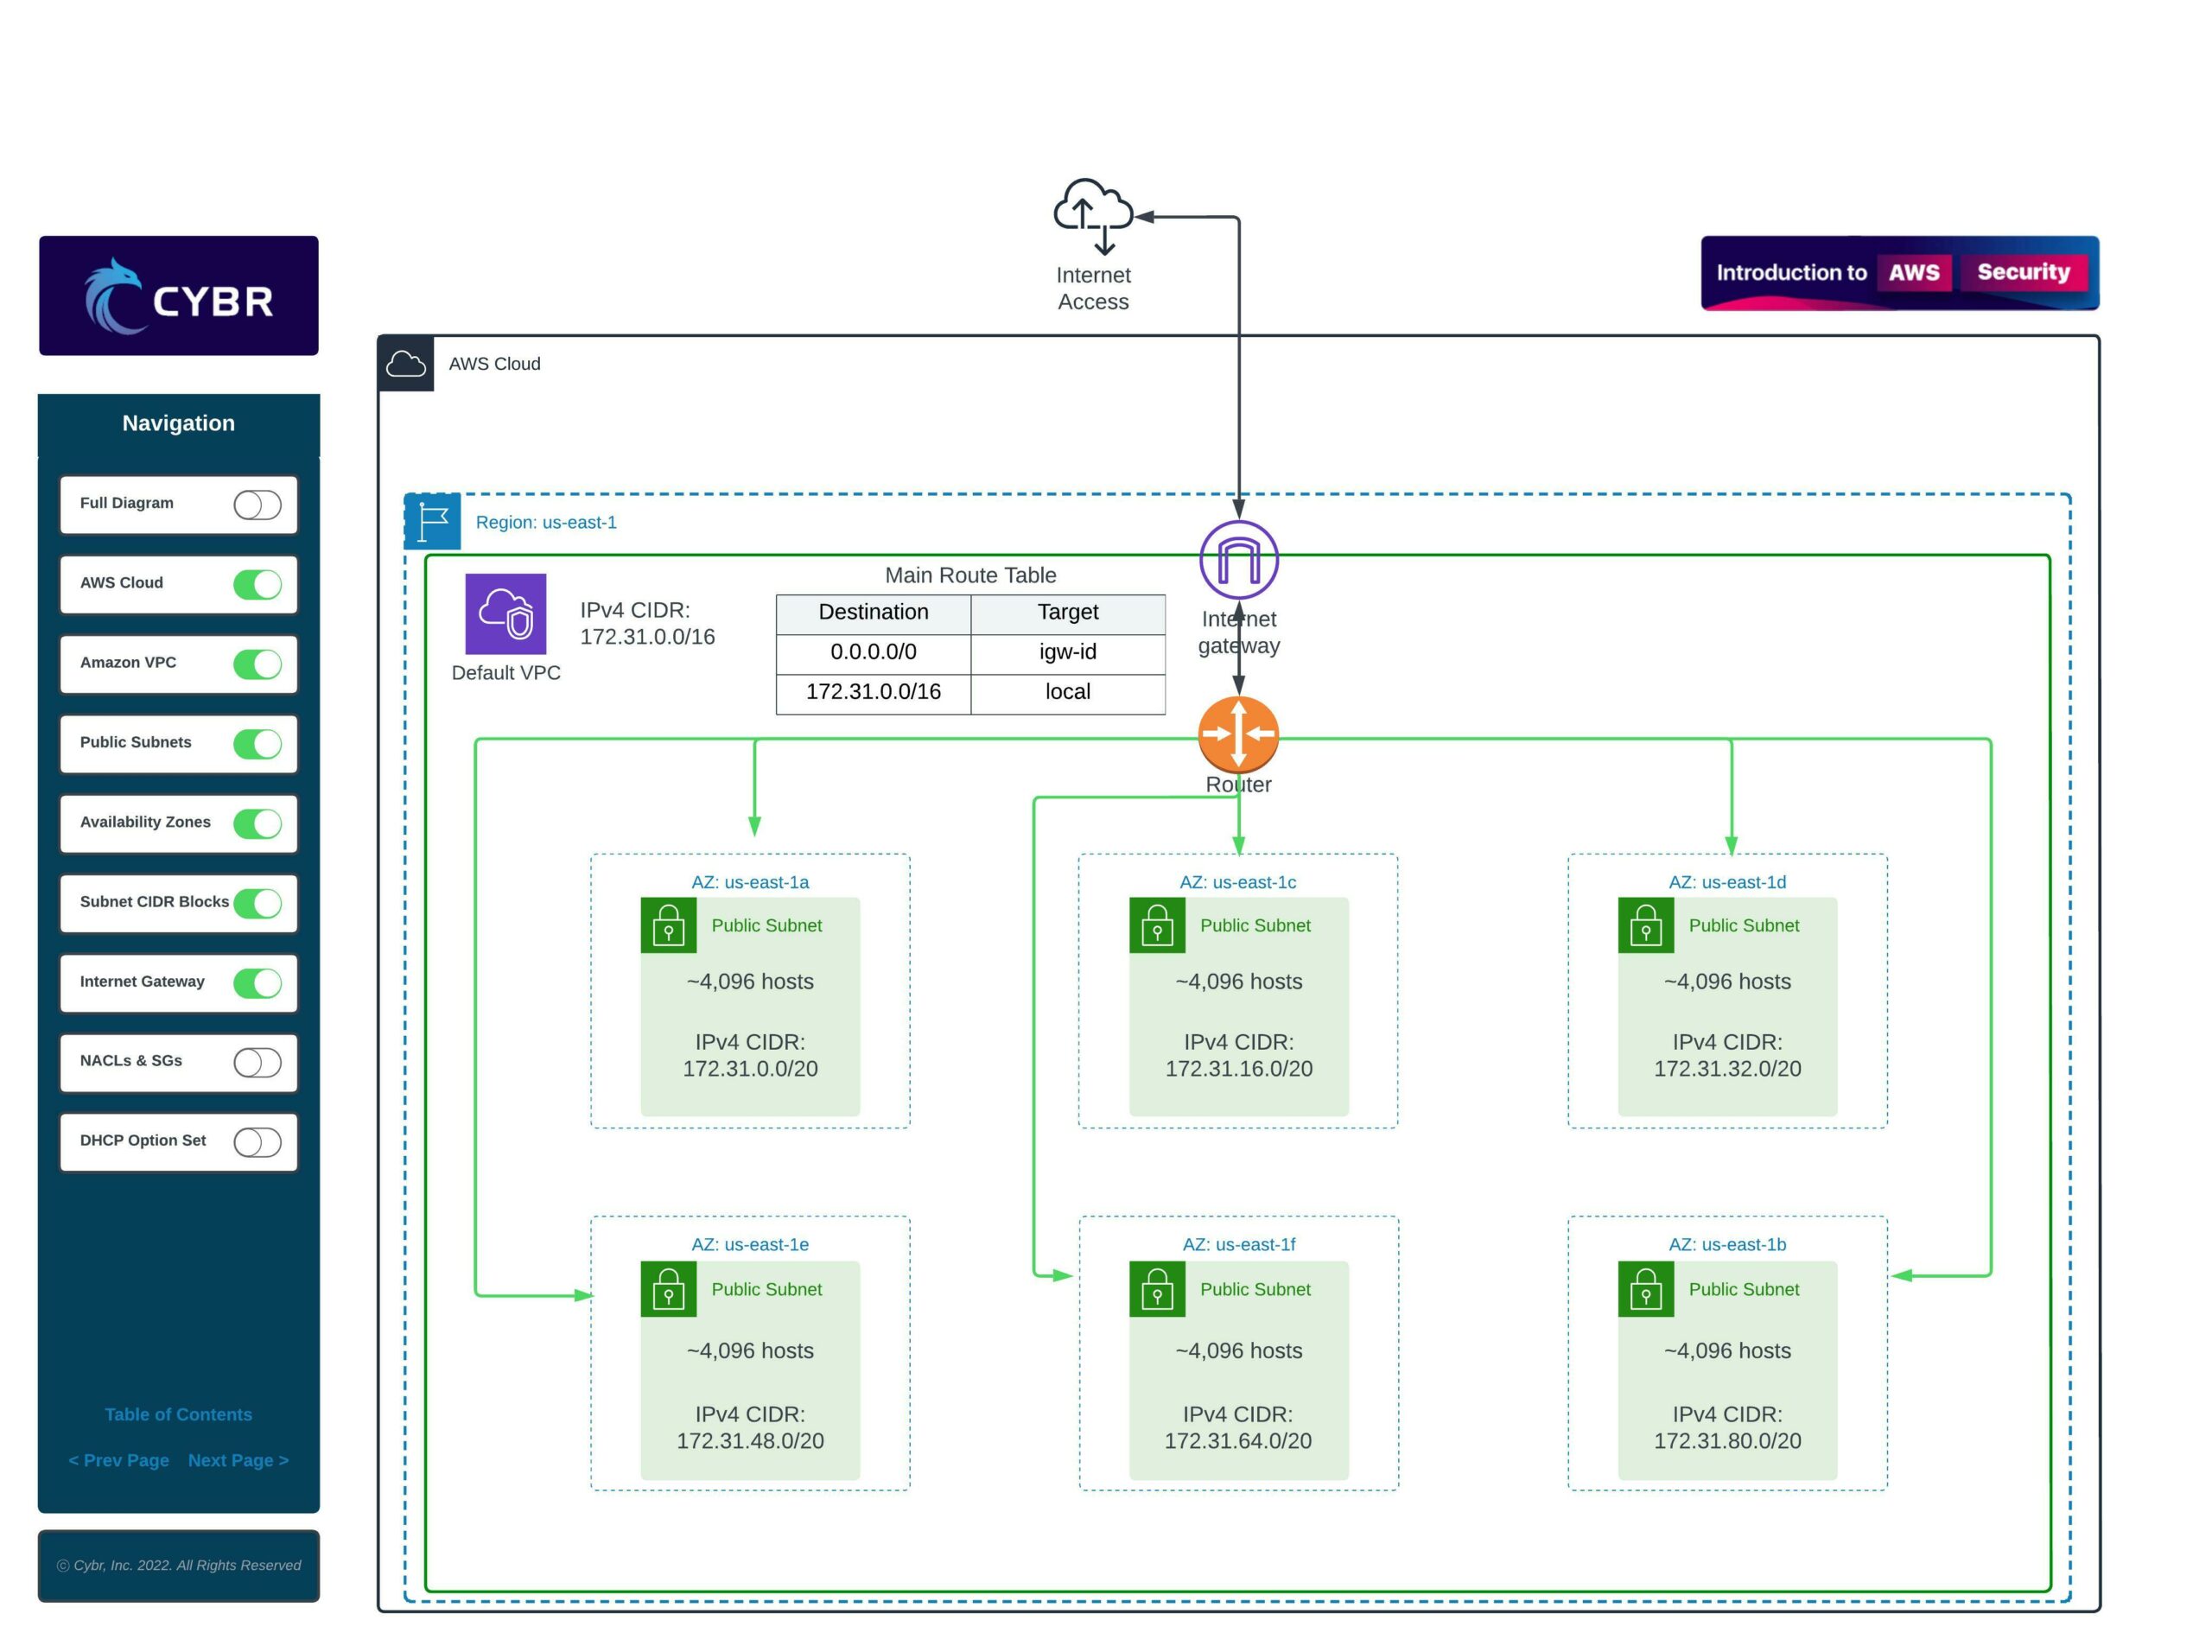
Internet Gateways and Route Tables
AWS also creates an internet gateway and a default route table which routes all traffic to the internet gateway, and this is what gives resources launched in the default VPC access to the open Internet. All instances or other resources that you deploy in this VPC and in these subnets will receive both private and public IP addresses and DNS records. This is one of our first security concerns with default VPCs, since it means that we don’t have any private subnets, and all resources launched in this VPC can be accessed by anyone by default.
Security Groups and ACLs
One way to protect resources launched in default VPCs is to use Security Groups. Another way is to use Network Access Control Lists, also known as ACLs or NACLs. The default VPC will create a default security group and default access control list as well, but you can create different and custom ones as you launch resources.

DHCP Options
Finally, AWS also associates default DHCP options for your AWS account with your default VPC. DHCP is what automatically assigns IP addresses to devices, and DHCP options sets in AWS give you control over DNS servers, domain names, and more.

Customizing default VPCs
These default VPCs are actually quite flexible because we can add new subnets, we can modify route tables, add new route tables, create new security groups and access control lists, etc… You can even create private subnets or make the default subnets private by changing settings…
So should you use default VPCs?
With that said, the usual recommendation is to delete these default VPCs and to start from scratch by creating your own. That way, you don’t forget to change any settings and you have complete control over the VPC, its subnets, and its other configurations. You also don’t end up accidentally launching a resource in a default VPC thinking that you had launched it into a non-default VPC.
Also, you can always re-create a default VPC, so if you end up deleting it and you change your mind later on, you can re-create a new default VPC…but again, this is an uncommon practice.
If you do choose to work with the default VPC that Amazon provides, your very first step should be to remove the default route in order to turn the default public subnets into private ones. If subnets don’t have explicit route table associations, then by default, the subnet is associated with the main route table. You would either need to modify this main route table which would affect all of the subnets, or you would have to create a separate route table and explicitly associate the subnets you want to make private with that new route table.
There’s another issue here worth noting about default VPCs: sometimes, AWS creates new Availability Zones in a Region. For every new AZ that AWS creates in your region, a new, default, and public subnet will be created for you. This is the default behavior for all default VPCs. If you don’t change this, you will end up with public subnets in every new availability zone that AWS creates. You want to avoid this kind of behavior since you need to be in full control of your subnets, especially public ones. Changing this is rather simple: as soon as you modify your VPC, this behavior stops and AWS won’t create default public subnets for those modified VPCs.
Conclusion
We’ve talked about what default VPCs are and how they work, and why it’s usually recommended not to use them and to delete them in order to replace them with non-default VPCs. But how do you create these non-default VPCs? Let’s complete this lesson and let’s find out in the next!
Yes, understood.