Install Kali on VirtualBox: The quickest way

Kali Linux is a free distribution that’s often used for digital forensics and penetration testing, and VirtualBox is a free hosted hypervisor for virtualization. The process to install Kali on VirtualBox can be done in a few different ways, and in this post we will explore one of the quickest ways.
One reason you may want to use Kali is because it comes pre-installed with many useful tools that we use throughout our courses.
While there are many ways of installing Kali, one of the simplest and quickest is to import it into VirtualBox, which is also a free tool.
Download VirtualBox
If you don’t already have VirtualBox or VMWare, go ahead and download whichever one you prefer, but I’ll be using VirtualBox.
All you have to do is go to virtualbox.org and download the latest version for your current operating system. I’m on a mac, so I’ll download the OS X version, but if you’re on Windows you would download that version.
Then, follow the steps to install VirtualBox. At this point, if you have any issues during the installation and you can’t figure out a solution, please reach out in our forums and we’ll be glad to help.
Download the latest version of Kali Linux
Once you have VirtualBox installed and running, it’s time to set up Kali Linux.
At this point, we have a few options. The two we will explore are:
- Install Kali via an ISO
- Import Kali via an OVA
There’s a great tutorial for using Kali ISOs located at this URL with instructions, so I won’t go into too much depth if you want to install Kali using an ISO which provides a bit more customizability but takes longer and requires more configuration.
Instead, I’ll use an OVA version. The main difference between OVA and ISO is that OVA will import Kali into VirtualBox instead of installing it as if we were inserting a CD version of Kali. This is a very simple way of getting Kali up and running without having to configure a lot of settings, and it will work just fine for this course.
First, we’ll want to download Kali at this URL.
If you want an ISO image of Kali to be able to boot from it, then you can download from that page, but since we’re using the OVA version and VirtualBox, we’ll need to click on this link that’s a bit further down the page.
We’ll download the 64-Bit version. This can take a few minutes depending on your internet connection.
Import and install Kali in VirtualBox
Once you’ve downloaded the OVA, go to VirtualBox and Import the Appliance (File -> Import Appliance), or double-click the OVA file.
Before importing, you’ll want to double-check settings to make any modifications necessary. Then, start the import process. This can take a few minutes.

After importing the appliance, we can check the VM’s settings again to make further modifications. Some of the settings to take a look at include CPU and Memory allocation, and this will depend on your system and how much you are willing to allocate to this virtual machine, so I’ll leave that up to you.
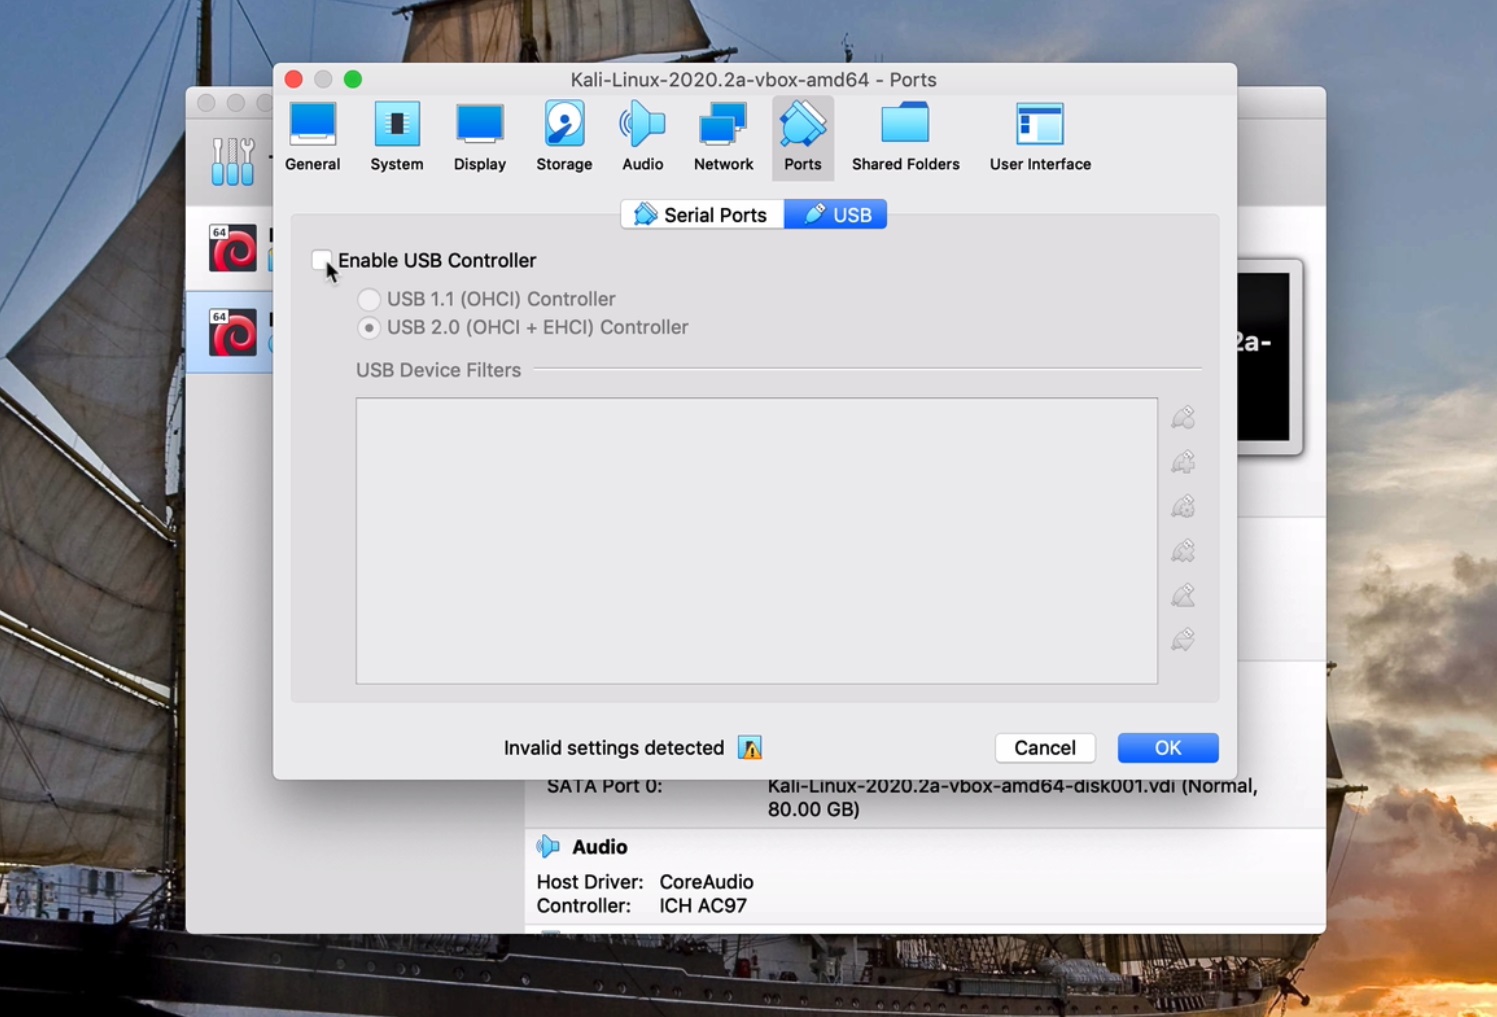
Disable USB 2.0
One setting I ran into issues with, however, is the USB 2.0 settings.
In our case, we will need to disable USB 2.0, or install a package that enables this functionality. Since we won’t be needing USB 2.0, I chose to disable it.
Select the virtual machine in VirtualBox and then click on Settings.
Go to “USB” (if doing this on Windows) or “Ports” (if doing this on Mac).
You can then uncheck the box “Enable USB controller” (you will need to click on the “USB” tab on Mac after clicking on Ports) and save settings.
We’re now ready to start the machine.
Log in using kali/kali as username/password (we will change this in a moment).
Optional for ISO only: installing guest additions
Note: this step should only be necessary if installing from the ISO, since Guest Additions should come pre-installed thanks to the OVA. So if you followed the steps above for the OVA install, you can skip this optional step.
The first step I recommend is installing Guest Additions to enable functionality like shared clipboard, shared folders, and other integrations.
We will follow steps from this documentation. Run these commands, one at a time:
sudo apt update

sudo apt install -y virtualbox-guest-x11

reboot
If that worked for you. Great, you’re done with this step and you can skip to the next! Otherwise, if that doesn’t work for you like it didn’t for me, there’s another method we can try from the same documentation but that is meant for older versions.
Go to “Devices” from the VirtualBox menu and select “Install Guest Additions.” This will mount the Guest Additions ISO in the virtual CD drive for our Kali VM. If you are prompted to run the CD, click on the Cancel button.
Double click the CD on your desktop.
Copy everything from the CD and paste it in your Downloads directory.
Then, run these commands from a terminal. Make sure you’ve changed directories to ~/Downloads like this:
cd ~/DownloadsNow run these commands, one at a time:
chmod 755 VBoxLinuxAdditions.run

sudo ./VBoxLinuxAdditions.run

sudo reboot
After the reboot, you should be able to resize your VM window properly.
If it still doesn’t, you can try changing your graphic driver by going to:
VM settings –> Configuration –> Screen –> graphic driver: choose VBoxSVGA
Delete everything in the downloads directory, and now let’s change our password.
Changing the default password
In a terminal window, type:
passwdMake sure you read the instructions because people oftentimes blow through these steps and wonder why it doesn’t work :-). The system will ask you to put in your current password first, then your new password twice.
What now?
Now that you have Kali installed, there’s a lot of stuff you can do. My recommendation is to look around at what’s already installed, and perform any customization you’d like.
Once you’re happy with customizations, it’s time to learn! Enroll in one of our courses and pick up new skills!
Otherwise, some cool things to do include installing the Damn Vulnerable Web Application or the OWASP Juice Shop to test your skills against vulnerable environments.
Above all, have fun and stay safe! A lot of the tools in Kali will get you in trouble if you use them on resources that you do not own or have explicit permissions for. So, when trying them out, be sure to use them on your own resources only, and not on production resources!


Responses