
In this lesson, we walk through setting up our environment in order to follow along with the hands-on demonstrations throughout the course. This is an important lesson to complete if you want to apply what you’re learning hands-on, so if you get stuck at any point in time, please reach out and we’ll help you resolve the issue so that you can move on.
The first thing we need to configure is Kali Linux, which is a free Linux distribution that’s often used for digital forensics and penetration testing. The reason we want to use Kali is because it comes pre-installed with many of the tools we’ll be using throughout the course, which will help us get going and avoid issues that can come from running different operating systems.
If you already have a lab environment set up, feel free to skip ahead to the section called “Installing Docker in Kali” in this lesson, and pick up from there.

Creating a Kali Virtual Machine with VirtualBox
Don’t worry, this step is not difficult and it doesn’t take too much time. And again, this is all free.If you don’t already have VirtualBox or VMWare, go ahead and download whichever one you prefer, but I’ll be using VirtualBox.
All you have to do is go to virtualbox.org and download the latest version for your current operating system. I’m on a mac, so I’ll download the OS X version, but if you’re on Windows you would download that version.
Then, follow the steps to install VirtualBox. At this point, if you have any issues during the installation and you can’t figure out a solution, please reach out in our forums and we’ll be glad to help.
Once you have VirtualBox installed and running, it’s time to set up Kali Linux.
I’ll use an OVA version. This is a very simple way of getting Kali up and running without having to configure a lot of settings, and it will work just fine for this course.
First, we’ll want to download Kali at this URL: https://www.kali.org/get-kali/#kali-virtual-machines
Since we’re using the OVA version and VirtualBox, you will simply click on VirtualBox and it will start the download. (I’m not linking to it directly since versions will change over time)
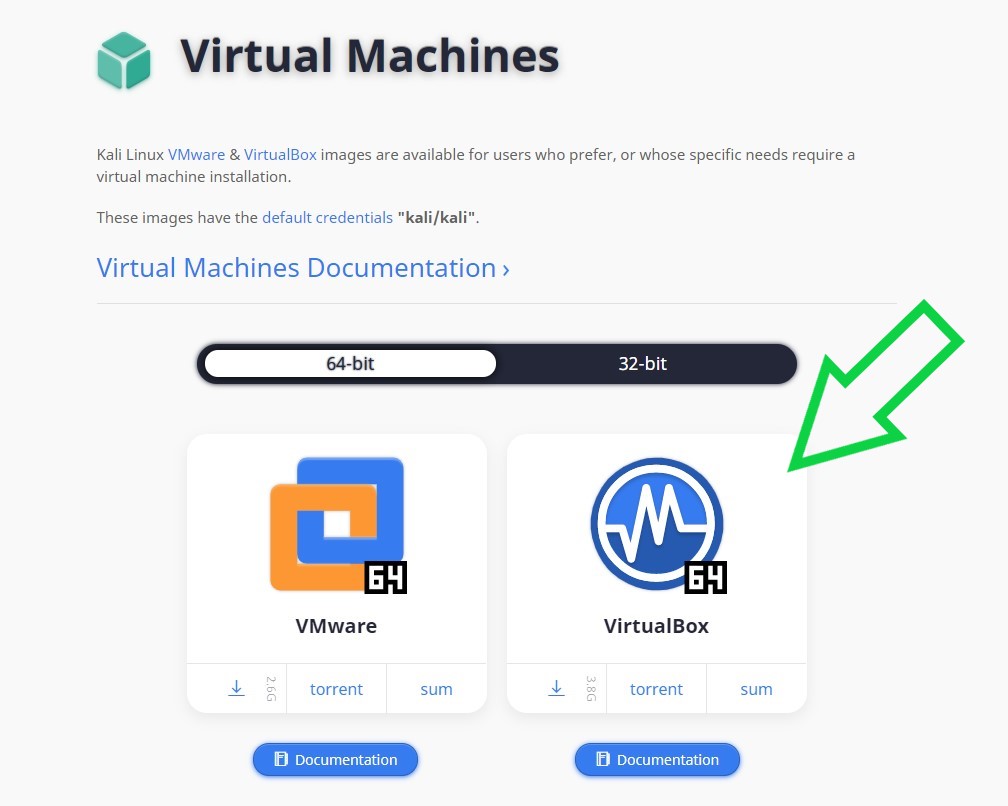
And we’ll download the 64-Bit version. This can take a few minutes to a couple of hours depending on your internet connection.
While that’s downloading, a quick note for those on Windows: if you have WSL (Windows Subsystem for Linux) on Windows 10 installed, some students have reported issues with downloading and updating packages inside of Kali. The following sub-section addresses that issue. If you don’t have WSL installed, you can skip this section. If you’re not sure what it is and you are running Windows 10, follow the steps below just in case.
Optional: WSL fix
Open up a Windows PowerShell with admin privileges and type in this command:
bcdedit /set hypervisorlaunchtype offCode language: JavaScript (javascript)You may want to reboot just for good measure.
You can always re-enable it whenever you need, but that should prevent issues with labs in this course.
End of Optional: WSL fix
Once you’ve downloaded the OVA, go to VirtualBox and Import the Appliance (File -> Import Appliance), or simply open the OVA file.
Then, start the import process. This can take a few minutes.

After importing the appliance we can check the machine’s settings and tweak anything that we’d like. This is where you can add more resources to the virtual machine, for example, but I’m personally going to leave it to defaults. We’re now ready to start the machine.
Log in using kali/kali as username/password (we will change this in a moment). Then, you’ll probably need to resize the window since it’s usually very small when you first start it. You can do that from the View menu, or by dragging the corner of the window.
Now that we’re logged in, let’s change the default password.
Changing the default password
passwdMake sure you read the instructions because people oftentimes blow through those steps and wonder why it doesn’t work :-). The system will ask you to put in your current password first, then your new password twice.
Now that we’ve got a new password, let’s install Docker.
Installing Docker in Kali
sudo apt update
sudo apt install -y docker.ioCode language: CSS (css)
At this point, the docker service is started but not enabled. If you want to enable docker to start automatically after a reboot, which won’t be the case by default, you can type:
sudo systemctl enable docker --nowThe last step is to add our non-root user to the docker group so that we can use Docker:
sudo usermod -aG docker $USERCode language: PHP (php)We now need to reload settings so that this permissions change applies. The best way to reload permissions is to log out and back in.
If you don’t want to do that, a quick workaround that will only apply to the current terminal window is:
newgrp dockerIf that doesn’t work, try to reboot the system. Otherwise, you may found that other terminal windows haven’t reloaded settings and you may get “permission denied” errors. But, if you’d rather not log out or reboot at this time, you can use the above command.
Running our target environment with Docker
With docker installed, we can now pull in different environments as we need them, without having to install any other software for those environments.
The Damn Vulnerable Web Application (DVWA)
For example, if we want to run the Damn Vulnerable Web Application, we can do that with this simple command:
docker run --rm -it -p 80:80 vulnerables/web-dvwaIf that doesn’t work, try running this command first:
docker pull vulnerables/web-dvwaand then re-run the docker run command above.
You’ll have to wait until it downloads the needed images and starts the container. After that, it will show you the apache access logs so you can see requests going through the webserver.

You can navigate to 127.0.0.1 in your browser in order to access the web application.
It will ask you to login, and you can use the username admin and password password. Initially, you will be redirected to localhost/setup.php where you can check configurations and then create the database. It should automatically redirect you to log in again, but if it doesn’t, scroll down and click on login to re login.
Please note that you’ll have to do these quick steps each time you take down your environment and bring it back up. So if you take a break from the course and come back later after shutting down the environment, you’ll have to use the docker run command again.
Do manually shut down the environment, go back to the terminal window where we started the container, and use Ctrl + C or Cmd + C to get our terminal back and terminate the docker environment.
Now that we’ve got our lab environment up and running, it’s time to download sqlmap!
First time after 10 months i successfully downloaded DVWA.
That must have been super frustrating. Good job sticking to it and making it work!
Its beyond frustrating there is so much information out there. It is difficult to pinpoint accurate information to help me earn my first bounty. I thought data science was hard after 5 years but to me ethical hacking is more difficult hence why in 10 months since i started i have not found anything. I am only focusing on three vulnerabilities:
– SQL Injection
– Cross Site Scripting
– Command Injection
I have zero interest in breaking any rules or laws all i want is bugs nothing more.
Here leave my tool with docker compose to setup up a lab
https://github.com/MoisesTapia/TWAPT
NOTE: The Cybr team has not reviewed software at this link. Use at your own discretion and risk.
sir, please give me the link to kali, I confused the link of the video content
Looks like Kali updated their website, so the process to download has changed. It’s actually simpler now which is great. Simply go to this URL: https://www.kali.org/get-kali/#kali-virtual-machines and select VirtualBox (if you’re following along what I did) or VMware if you prefer. The rest is the same!
Hey Christophe thankyou for these courses wanna ask that is socket necessary to run this tool???
Hey Junaid, not sure I understand what you mean? Do you have a limitation?
Done
My laptops are too old and have problems with Virtualbox. Can I setup this on a EC2 instance with xfce? Will the instructions here need any modifications?
Hey, yes you can definitely run this on EC2 instead. I haven’t personally used xfce, and the steps may be slightly different, but it should work fine. Just will need to troubleshoot any errors you get along the way!